There’s an undeniable love-hate relationship we have with PDFs. You hate it because you can’t easily interact with the content that’s in it; you love it because it can keep that content intact. And for better or worse, that dichotomy is the format’s strength.
From password encryption to limited file permissions, there are different ways to lock down your PDF content. But oftentimes, you may not fully appreciate what they’re capable of. Those features are crucial because though you may not realize it, a PDF file on its own isn’t as secure as you may think.
If there’s one pain point for businesses, it’s the paperwork. Or rather the digital document work.
It’s the multiple tasks you have to do with PDF documents that can range anywhere from filing and revising to securing and reviewing. What makes it even tougher is that most of those documents are in the PDF format.
If you’ve been struggling to get your business on track with all the PDF work that needs to be done, you’ll be happy to know that Able2Extract Pro 11 is aimed at making things easier and stress free from here on in.
Take a look.
1. Contract Revisions Are Simplified
In any business, it’s essential to get contracts that cover everything. From drawing them up to negotiating terms, half the battle is in the collaboration process. Contract drafts are usually transmitted via PDF and can span multiple pages. Revisions aren’t fun and performing the edits, even worse.
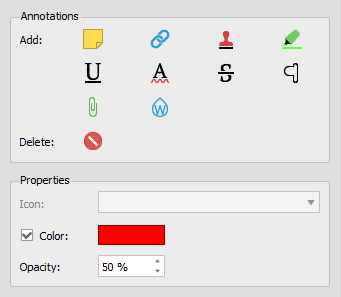
But here’s where it gets a bit simpler. Able2Extract Pro 11 can help you annotate PDF contracts right on the page. You can highlight clauses you don’t agree with, insert carets where text needs to be re-worded, or add sticky notes on additional details that should be considered.
2. Redact Sensitve PDF Data When You Need To
One thing about paperwork that can give you a ton of stress is leaking information you aren’t supposed to. Take tax filings, for instance. What’s more stressful than filing taxes for your business? Being selected for a tax audit where the revenue agency will inspect every ledger, receipt, and banking statement you have. The accuracy of your business books is crucial, but so is the security of the information that doesn’t need to be inspected.
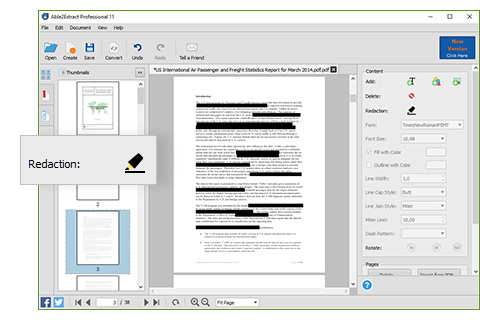
This is where redacting any sensitive information is essential. Able2Extract Pro 11 can permanently and selectively delete any information you don’t want displayed. No need to extract the data to Word, insert makeshift black rectangles around your text, and re-convert it to PDF. You can simply open your PDF, redact your content, and save your file.
3. You Can Work With Third Parties Seamlessly
Working with third-parties can be a nightmare when the documents passed around are secured PDFs and you all need to work around them. Having access to PDFs you can interact with is the first thing you need.
For those needing a way to work openly with security and PDF files by encrypting and decrypting your PDFs. Able2Extract Pro 11 will let you open, edit and decrypt PDFs to keep the collaboration process going. Or you can open, redact, and then encrypt the file to ensure that sensitive details aren’t leaked.
4. Edit Professional Business PDFs Without Converting
When it comes to company information in PDF, your first instinct is to type on the page in order to add in your changes. But it isn’t as straightforward as typing in MS Word. In fact, the inability to do what you naturally would is at the core of everyone’s frustration with the format.
But you can now expect to update your PDF documents almost in the same way you would in a Word Document. Whether you need to update pricing lists, product information brochures or company newsletters, simple text and page dits are possible in Able2Extract Pro 11. You can match the font, colour and size of the existing text or merge and split pages by just clicking in the PDF editing side panel.
Check out the video above for a taste of how to edit PDF files the smart way.
5. Access Scanned PDF Information Easily
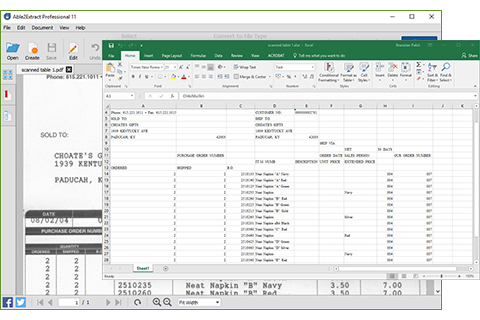
Thus far, the completely paperless office hasn’t arrived yet, which means you still have to cater to and work with scanned documents that are emailed in. This is especially hard when you need to access textual data from that PDF.
Able2Extract Pro has already had the scanned PDF conversion part nailed for years. What’s new is that it can convert image-only scanned PDFs into PDFs with searchable text. This means that you can navigate through PDF text with the search functionality when you need to make changes or find certain sections in lengthy PDFs.
6. Tweak Professional Branding Material Yourself
Marketing and branding material is essential when you run your company. When you need to distribute brochures or information packages online, your professional material will be published in the PDF format. So how do you effectively edit the branding material you have?
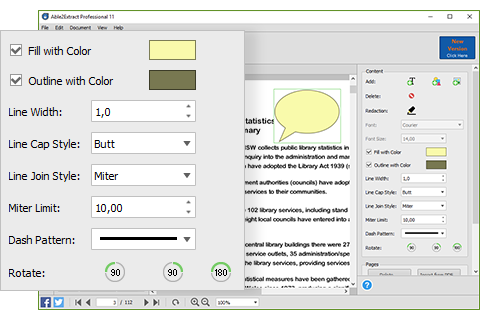
The enhanced PDF Editor in Able2Extract Pro 11 has a few new editing features that will allow you to make additions and refined edits to PDFs. It will allow you to modify content page objects: business logos, page borders, and large PDF page art. You can also add in images and insert vector shapes for an added visual boost. Make your edits right in the PDF without the need for conversion or any graphics software.
Business productivity is about to change. It’s all about getting set up with the tools that can get the job done. See where Able2Extract Professional 11 fits into your workflow. Test it out for 7 days with a free trial version.
It’s been over a week since we launched Able2Extract Professional 11 and we hope you’re all enjoying the latest features and the boost in productivity.
As you may have noticed during this year’s launch, Able2Extract Professional is the only tool we’ve upgraded. And no, we didn’t forget to upgrade the Standard version. In fact, we decided that, in order to give you the best in PDF conversion technology, we’re now focusing solely on Able2Extract Professional.
The Standard version has been an Investintech staple from the very early days, but we believe that providing you with one tool is, by far, a more effective solution to getting your PDF tasks done.
In other words, this change means giving you a product that allows you to do every PDF task you need without having to resort to another tool. As a result, you get a complete out-of-the-box PDF user experience.
On top of PDF editing, annotation and redaction, as well as upgraded PDF security features, you now get the added bonus of scanned PDF conversion. You can integrate hard copy documents into your digital workflow seamlessly.
There are a few details to note with this change, though.
Save More With Discounted Upgrades
As a licensed user of a prior version, you are entitled to a significantly discounted upgrade to our all-new Able2Extract Professional 11.
Upgrades from all Able2Extract Standard versions to Able2Extract Professional 11 is only $49.50. You don’t need to pay full price to get the new version and the latest features.
Get More From Technical And Customer Support
In addition, we encourage everyone to join our Software Advantage Plan for complete, uninterrupted and upgraded support when making the transition. It costs only $39.95 for a yearly subscription for front-of-the-line support on your most pressing issues and questions.
Plus, there are other VIP member perks to enjoy:
Free access to all minor products updates and major upgrade
Exclusive access to new, unreleased product builds
A personalized web portal
Special volume discounts
This is a major change, but it’s a positive one. The goal: to make your Investintech experience better than ever. If you haven’t checked out Able2Extract Professional 11 yet, you can try it free for 7-days.

 If you’re not sure how to compress a PDF so that you can share and store it more easily, then you’ve come to the right place.