Spring has begun and it’s time to get rid of your winter clothes and take out that light spring outfit. But it’s also that time of year where you need to do big spring housecleaning. It’s out with the old and in with the new.
But this doesn’t only apply to your house. There’s one other thing that needs to be cleaned and it’s perhaps the more important one: your computer.
There’s an undeniable love-hate relationship we have with PDFs. You hate it because you can’t easily interact with the content that’s in it; you love it because it can keep that content intact. And for better or worse, that dichotomy is the format’s strength.
Working with MS Excel is hard enough as it is with one worksheet. But when you work with more than one, the difficulty in dealing with that data increases tenfold with every single worksheet you add on.
To help, here are a few basic tips, handy tricks and informative tutorials to make working with multiple worksheets in Excel ten times easier for you.
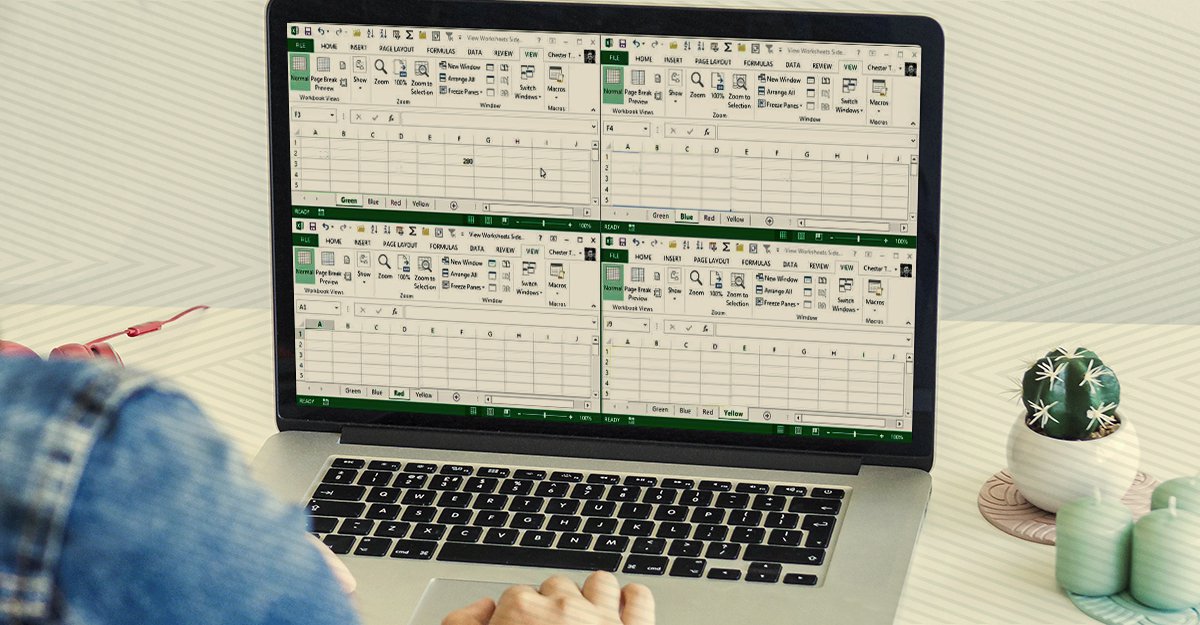
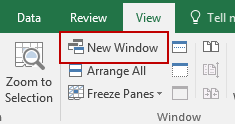
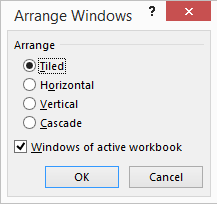
1. Viewing Multiple Worksheets At Once
A simple tip to start—customizing your view. It can be easy to lose track of which sheet you’re working on, especially when you have several worksheets to deal with. To put your worksheets front and center,
a) Open your workbook in Excel.
b) Click on the New Window button for every worksheet you want to view in that workbook.
c) In each new window, click on the tab of the worksheet you want to view.
d) Once the worksheets are displayed, click on the Arrange All button in the View window
e) In the following dialog, select your arrangement view. Ensure that you put a check in the Windows of active workbook option.
From there, you’ll be able to get a bird’s eye view of every worksheet in the workbook you need.
2. Viewing More Worksheet Tabs
This is another simple tip that may go unnoticed. Because the scrollbar at the bottom hogs all the space at the bottom of your window, the number of worksheet tabs you can see is limited. An annoyance when you have more than 3 worksheets.
To view more, simply hover over the 3 dots at the left of the scrollbar. Then click and drag it to the right. You’ll instantly start seeing more of your worksheet tabs displayed.
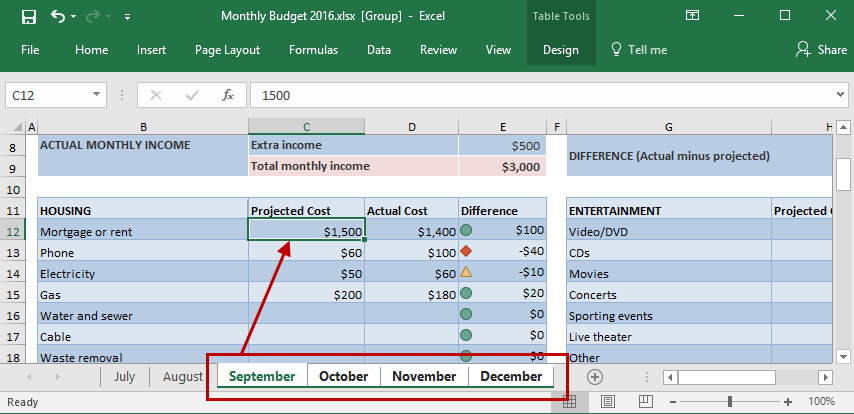
3. Grouping Your Worksheets Together
In Excel, working with your worksheets as a single group is a quicker way for applying formulas and formatting across worksheets with the same formatting. For instance, let’s say you need to change your monthly rent costs and regular bills. If you’re moving in September and need to update your budget worksheets, grouping them together will let you input the data once to update the entire group.
a) Click on the first worksheet tab you wish to edit.
b) Then Click + CTRL (for non-adjacent worksheet tabs) or Click + Shift (for adjacent worksheets) on the other worksheet tabs to add it to the group.
c) Modify the cell as needed. Click on enter.
To ungroup your worksheets, you can right click and select Ungroup Sheets option. This may seem like a basic tip, but it’s a powerful one to have!
4. Copying Formulas Between Worksheets
One handy tip for working with data across worksheets is to copy formulas that call for repetitive calculations. We’ve covered this tip before in our post, Work With Excel Data Like A Pro With 9 Simple Tips, but is a great tip worth mentioning again:
a) With the worksheet containing the formula you wish to copy opened, CTRL + clickon the tab of the worksheet you want to copy it into.
b) Click on or navigate to the cell with the formula or data you need (in the opened worksheet).
c) Press F2to activate the cell.
d) Press Enter. This will re-enter the formula or data, and it will also enter it into the same corresponding cell in the other selected worksheet as well.
5. Using Formulas to Link Worksheets
Despite what you may think, data in multiple worksheets can be more efficient. When you need to add cell values from different worksheets, it’s possible to create and use a formula that can pull data from other worksheets that are in the same workbook and formatted similarly.
This tutorial from ExcelFormulas gives you a solid easy-to-understand explanation of how this trick can make your task easier. It goes the extra mile and even shows you how the same methods can be applied to multiple workbooks, as well.
6. Consolidating Data From Multiple Worksheets
If you need to combine data from different worksheets, this tutorial from Tuts+ Computer Skills will show you step-by-step how to combine your data from multiple sheets into one pivot table.
This is perfect if you’re keeping track of different types of information that are related but are separated in individual worksheets. You can dynamically connect them into one single worksheet so you can update them all at once. Note that this tutorial uses Excel 2013, but is virtually the same for Excel 2016.
7. Importing Multiple Excel Sheets from Multiple Excel Workbooks
This following trick from ExcellsFun is a bit more advanced, but helpful for getting your Excel data from different worksheets and workbooks into an individual worksheet using PowerQuery.
Using the example of track sheets being used to analyze sales rep performance, this tutorial also links out to a resource where you can access those practice files for a good hands on learning experience to master this skill.
What tips do you have for working with multiple Excel worksheets?
It’s no mystery that we’re all about making your paperless transition easier. Regardless of your usual paper-based habits, businesses are increasingly adopting the practice. This slow acceptance and office-changing trend is making a nearly completely digital office more realistic.
Every small step towards a paperless workplace counts, and people are going about it at their own pace. Yet with today being World Paper Free Day, an AIIM initiative that tries to get people and businesses to go paperless for one day, there’s no time like the present to practice one full day without paper!
So we’re taking a quick, light hearted look at where you stand as a paper free advocate, and offering up a few strategies to help you take it one step further to working smarter, more efficiently in the workplace today.
Here’s what you can do if….
You Still Use Scratchpads, Notebooks & Agendas
Most of you may still using notepads, notebooks and agendas, and that’s understandable. You’re more comfortable with pen and paper. It feels more natural to you than typing on a screen. We get it. But keep in mind that comfort zones can be a disadvantage, and investing over 75% of your work in hard copy ways can make it difficult to go paper free.
For today, take baby steps. For example, to get into the habit of digitizing your schedule, start small by scheduling certain things, like face-to-face meetings or meals in Google Calendar. Or try integrating a few tools into your brainstorming sessions like mind mapping tools. Even project management tools like Trello is simple yet powerful enought to keep your task lists organized and up to date with your team or meeting objectives.
You’re Using Sticky Notes And Loving It
If you’re using sticky notes, you’re on the path towards being paperless—you don’t use entire sheets of paper or spend too much time in notebooks. A scant piece of paper is all that’s needed. While you’re on your way, there’s still the issue of getting you to do it digitally.
An easy way to turn this into a paperless habit? If you’re on a computer, you may as well use your browser. Try quick tricks like turning Chrome into a notepad or creating a Google Doc from your browser toolbar and give yourself access to a digital note with a single click. Also, consider using Sticky Notes on Windows 10 or Notes on Mac straight from the desktop itself. Now’s the time to use those apps, if you haven’t been doing so already.
You Take Pictures When You Don’t Have A Pen
A picture says a thousand words, and over time a quick digital snap can save you just as many pieces of paper. We wouldn’t be surprised if you’re already taking pictures of information and documents with your phone when there’s no pen or paper to be had. And that’s great! It’s an effective, yet simple method for jotting things down.
Quite obviously, this also comes in handy at the office. For instance, if you want a few hard copy documents on file and don’t have access to a scanner, get a scanning app on your phone. Evernote Scannable, for instance, is convenient and works on your iPhone and iPad. For Android, try CamScanner. Both have great features to work with any type of document you scan into digital form.
You Work At A Desktop Computer
You practically have no paper to work with whatsoever. Your work is all within MS Word, MS Excel or some digital file format, which are primarily on your computer. You have everything at your disposal, yet there are times when printing up a document is tempting. Trust us. We’ve been there before.
As a digital worker, you can come across PDF documents that require either conversion, editing or minor modifications. So consider the tools you use. For instance, you may want to set up a document management system complete with an all-around PDF converter tool to keep your work going smoothly no matter what the task.
You’re Mobile, Work Remotely And Completely In The Cloud
You’re more paper-free friendly than you realize! Almost all your work is stored online, shared digitally, and being mobile, well, that means gadgets are your main tool for working with documents. The one obstacle that may draw you back to paper is the limited tasks you can perform with light weight tools. If you’re working on a netbook or tablet, web-based tools and apps are your best bet to getting things done.
For this, try curating a good list of online go-to tools. For example, when you have a PDF, there are a few that let you perform PDF tasks in a web browser, no software needed. Also, ensure that you have a way to work with and access your cloud accounts effectively. They’re your main document hubs, so they’re essential to your work.
One last trick? Use the speech-to-text feature on both Android and iPhones for dictations. It’s a convenient mobile alternative to pulling out a notepad. Your keyboard, when activated in any app, will usually have a microphone icon. Tap on that, start talking and you’re good to go.


 If you’re not sure how to compress a PDF so that you can share and store it more easily, then you’ve come to the right place.