7 Tips On How To Work With Multiple Worksheets In Excel

Excel Spreadsheet Diagram

Working with MS Excel is hard enough as it is with one worksheet. But when you work with more than one, the difficulty in dealing with that data increases tenfold with every single worksheet you add on.

To help, here are a few basic tips, handy tricks and informative tutorials to make working with multiple worksheets in Excel ten times easier for you.

1. Viewing Multiple Worksheets At Once

A simple tip to start—customizing your view. It can be easy to lose track of which sheet you’re working on, especially when you have several worksheets to deal with. To put your worksheets front and center,

a) Open your workbook in Excel.

b) Click on the New Window button for every worksheet you want to view in that workbook.

Selecting Excel New Window Option

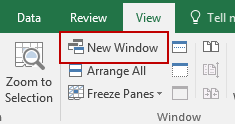
c) In each new window, click on the tab of the worksheet you want to view.

d) Once the worksheets are displayed, click on the Arrange All button in the View window

e) In the following dialog, select your arrangement view. Ensure that you put a check in the Windows of active workbook option.

 Arranging Windows In Excel

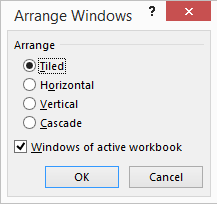
From there, you’ll be able to get a bird’s eye view of every worksheet in the workbook you need.

2. Viewing More Worksheet Tabs

This is another simple tip that may go unnoticed. Because the scrollbar at the bottom hogs all the space at the bottom of your window, the number of worksheet tabs you can see is limited. An annoyance when you have more than 3 worksheets.

Expanding Excel Worksheet Tab View

To view more, simply hover over the 3 dots at the left of the scrollbar. Then click and drag it to the right. You’ll instantly start seeing more of your worksheet tabs displayed.

3. Grouping Your Worksheets Together

In Excel, working with your worksheets as a single group is a quicker way for applying formulas and formatting across worksheets with the same formatting.  For instance, let’s say you need to change your monthly rent costs and regular bills. If you’re moving in September and need to update your budget worksheets, grouping them together will let you input the data once to update the entire group.

a) Click on the first worksheet tab you wish to edit.

b) Then Click + CTRL (for non-adjacent worksheet tabs) or Click + Shift (for adjacent worksheets) on the other worksheet tabs to add it to the group.

Editing In Excel Worksheet Group

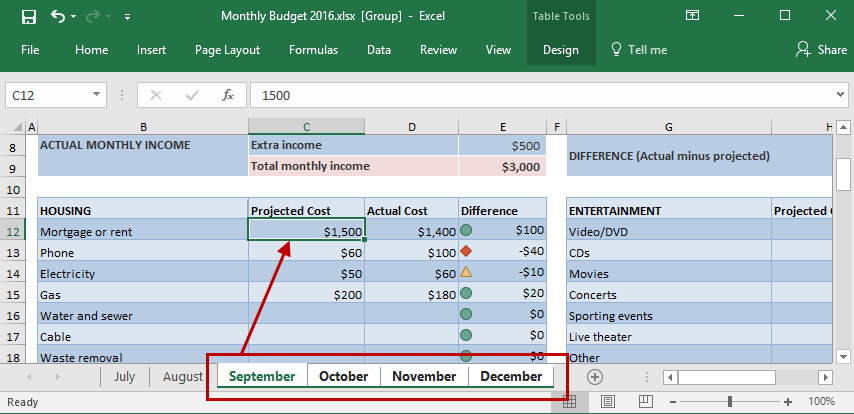
c) Modify the cell as needed. Click on enter.

To ungroup your worksheets, you can right click and select Ungroup Sheets option. This may seem like a basic tip, but it’s a powerful one to have!

4. Copying Formulas Between Worksheets

One handy tip for working with data across worksheets is to copy formulas that call for repetitive calculations. We’ve covered this tip before in our post, Work With Excel Data Like A Pro With 9 Simple Tips, but is a great tip worth mentioning again:

a) With the worksheet containing the formula you wish to copy opened, CTRL + clickon the tab of the worksheet you want to copy it into.

b) Click on or navigate to the cell with the formula or data you need (in the opened worksheet).

c) Press F2to activate the cell.

d) Press Enter.  This will re-enter the formula or data, and it will also enter it into the same corresponding cell in the other selected worksheet as well.

5. Using Formulas to Link Worksheets

Despite what you may think, data in multiple worksheets can be more efficient. When you need to add cell values from different worksheets, it’s possible to create and use a formula that can pull data from other worksheets that are in the same workbook and formatted similarly.

This tutorial from ExcelFormulas gives you a solid easy-to-understand explanation of how this trick can make your task easier. It  goes the extra mile and even shows you how the same methods can be applied to multiple workbooks, as well.

6. Consolidating Data From Multiple Worksheets

If you need to combine data from different worksheets, this tutorial from Tuts+ Computer Skills will show you step-by-step how to combine your data from multiple sheets into one pivot table.

This is perfect if you’re keeping track of different types of information that are related but are separated in individual worksheets. You can dynamically connect them into one single worksheet so you can update them all at once. Note that this tutorial uses Excel 2013, but is virtually the same for Excel 2016.

7. Importing Multiple Excel Sheets from Multiple Excel Workbooks

This following trick from ExcellsFun is a bit more advanced, but helpful for getting your Excel data from different worksheets and workbooks into an individual worksheet using PowerQuery.

Using the example of track sheets being used to analyze sales rep performance, this tutorial also links out to a resource where you can access those practice files for a good hands on learning experience to master this skill.

What tips do you have for working with multiple Excel worksheets?

3 Tips On How To Use Excel For Calculating Taxes From PDF Data

Calculating-Taxes-Excel Photo Credit: gonzalo_ar via photopin cc

Tax season rolls around every year and with it comes the head ache of getting organized. It means digging up year old statements and revisiting your ledgers, which is a daunting task in itself. Even worse, if you’re a procrastinator, it may mean the added stress of finding walk-in tax centres booked solid, forcing you to take the DIY approach.

Admittedly, doing taxes yourself can be risky. But user-friendly tax software and speedy e-filing methods are incentive enough to make the attempt. Getting the numbers right is what matters most.  For that, there’s Microsoft Excel, one of the handiest tools for calculating and dealing with complex data.

If it’s your first time doing your taxes online, we’ve got a few important pointers that can make working with taxes and Excel easier for you.

1. Insert, Adjust And Calculate Your Tax Data In Spreadsheets 

Tax CalculatorPhoto Credit: Jorge Franganillo via photopin cc

First off, to calculate your income taxes, you first need to calculate your taxable income. To do this, convert your financial data into Excel so you can work in your applicable deductions, credits, and exclusions using Excel formulas and functions. They can seem scary and complicated, but once you get the hang of them, they are invaluable!

Second, because all invoices and tax deductible receipts are different, you want to ensure that your converted data is properly adjusted and laid out.  If you’re calculating your federal income tax using tables in Excel, your results depend on where the data is placed. Thus, correctly inserting disparate data from the start will help prevent major calculation errors.

Able2Extract Excel Preview Panel A custom PDF to Excel conversion though can fix the alignment of cells and their data just where you need them. Able2Extract lets you manually move the row and column lines and even give you a preview of how the data will look in your spreadsheet.

2. Use Separate Worksheets For Data Calculations

Every tax filing is different and depending on your situation you may need to use supplemental tax forms and schedules. You may also need other tools, like updated tax tables or the tax computation worksheet from the 1040 US tax return instructions.  So consolidating your data where needed can be an efficient way to stay organized.

Excel Worksheet Names

Every tax form, calculation, or schedule requires special attention. Consequently, you may want to use separate worksheets for different schedules or forms. This way you can set each one up with defined formulas for calculating specific data.

This has a lot of convenient benefits. Each year, you can go back to the same worksheet and just drop your updated numbers in. If you need numbers from different PDF statements, you can convert the relevant data into the same worksheet using Able2Extract.

Able2Extract Custom Excel Template
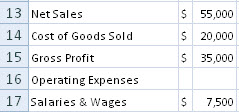
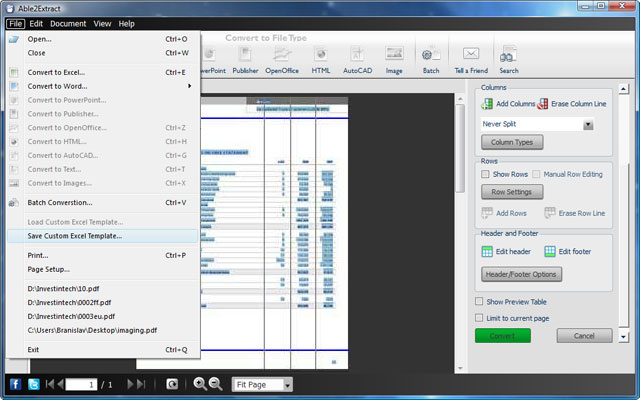
Moreover, its custom Excel template feature, you can set up your Excel conversion once, save it as a template (seen above), and use it on next year’s PDF statements, which, more than likely, will be formatted with the same layout.

3. Keep Data Formatting Consistent 

Consistent Data FormattingPhoto Credit: Jorge Franganillo via photopin cc

If you use different Excel formatting due to language and cultural preferences (commas for decimals or pound signs instead of dollar signs, for instance), you should make sure that all notations are consistent to avoid misinterpretation. Fortunately, Microsoft Excel is highly specialized in formatting and manipulating data.

To fix the formatting in Excel, you can use the Sort & Filter and Data Tools section in the Data tab or the Numbers and Editing sections in the Home tab.  To do this even more efficiently, reformat your PDF data even before it even reaches the spreadsheet. With PDF receipts and records, you can change the notation and formatting during the PDF to Excel conversion.  

Able2Extract Excel Conversion Parameters

Using the MS Excel conversion parameters in Able2Extract will adjust your data to fit the format you want to use in your spreadsheet, like whether or not to replicate the fonts from the PDF. Retain the dollar sign as a separate symbol, use European continental settings, or treat rows as columns and vice versa.

Able2Extract 8 Tip: How To Get Accurate Excel Spreadsheet Calculations During Tax Season

Using Excel is a great way to keep things organized during tax season.  The popular spreadsheet program has advanced features that let you work with your financial data as accurately as possible.

And that’s important.

Half the battle for tax filers every year is making sure that the numbers on those tax forms are correct.  The nitty-gritty calculations can be especially tedious if those numbers are generated from PDF conversions.

Fortunately, Able2Extract can refine the conversion process right down to the cell content.  Honourably mentioned by AccountingToday.com, the PDF converter was recognized for its PDF to Excel spreadsheet conversion and aiding in auditor control.  Now it’s time for you to get that same control over your taxes.

Introducing Able2Extract’s MS Excel Conversion Parameters

On top of the custom PDF to Excel conversion features you already know about, you can take advantage of conversion parameters to ensure that the converted PDF data falls in line with your tax spreadsheet analysis right from the start. The following options are located under View > Options…

PDF to Excel Conversion Parameters

Reposition The Minus Sign

In certain financial documents or reports, the minus sign symbol trails to the right of the number that it is associated with (e.g. “4,560-“ instead of “- 4,560”). Converting negative numbers where the minus sign trails to the right of the number can cause the resulting conversion to Excel to place these numbers as text, rather than numbers.  Move those trailing minus signs to the beginning of the number by selecting the Trailing Minus Sign Treatment. This will prevent it from being converted to textual items in Excel.

Keep The Dollar Sign Separate

Certain financial documents may contain dollar signs. Unfortunately, sometimes the dollar sign ($) creates a challenge in the way the program interprets column structure. Thus, the default is to meld the dollar sign into the same column as the number next to it.

PDF to Excel - Retaining the Dollar Sign

But if you wish to retain the dollar sign in its own separate column, check the Retain Dollar Sign as Separate Symbol option before converting.  Excel will treat the sign in the column as text.

Work With European Numeric Formatting

There are cases where some countries use European number formatting (1.234.567,89 vs. the North American equivalent written out as 1 234 567.89). However, PDF data in this format may be incompatible with your auditing tools or with some region specific versions of Excel.

You can change this easily with Able2Extract 8.  By selecting the European Continental Settings option, you can convert documents that adopt the decimal comma and “period” thousand separators to Excel formatted numbers correctly.

Display Your Data Differently

Sometimes you may need tabular data displayed differently to focus on specific areas.  For example, you may want to interpret data in terms of weekly revenue rather than by product.

PDF to Excel - Enable Table Unfolding

To transpose the data and move the data in columns to rows and the data in rows to columns, use the Enable Table Unfolding option. When selected, Able2Extract will generate output from a PDF in column structure to Excel in row structure or vice versa.

Enable Table Unfolding

Rotate Text into Excel

With pesky PDFs you may come across text in a table that has been rotated in a certain direction which would pose a problem for existing formatted Excel spreadsheets. Checking the Rotate Text into Excel box in the options menu will convert the rotated text into Excel upon conversion.

Just keeping a few of these options in mind can greatly lower the amount of stress you’re already going through with tax season. After all, it’s the simplest adjustments that can mean the difference between getting severely audited and getting a healthy tax return.

Exploring Able2Extract 8’s New PDF To Excel Custom Conversion Panel

We all know that when it comes to converting PDF tables, nothing comes out right.  Regular conversions aren’t enough.  Transferring digital banking statements or invoices into your tracking or budget spreadsheets becomes difficult when that information comes in tables of different shapes and sizes.

Sometimes the best way you can ensure an accurate PDF to Excel conversion is to literally move the columns and rows yourself before the conversion takes place. And this is where Able2Extract comes in.

With this latest version, the PDF to Excel custom conversion panel received a facelift.  And did it ever!  This new interface is now more intuitive and user-friendly than ever.  Functions and features are now at your fingertips.

To help get yourself familiar with the new conversion panel, here’s a basic FYI overview of what you can do with each feature. 

PDF to Excel

1. Page Range

With this section, you can designate a page range for applying and customizing the file’s table structure.  Add additional pages with the Expand… option or use the Exclude functionality to eliminate a page within your selected range.

2. Tables

Using the tables section, Able2Extract allows you to Add and Delete tables to a page by left clicking on it. Select the Replot functionality and Able2Extract will recalculate the column structure for the page range.

3.Columns

With your tables set, you can then edit their structure. Select either the Add Columns or Erase Column Line to start customizing your tables.   You can then click on your spreadsheet to insert where you want your column lines or click on the ones you want to delete. This is perfect for correcting column misalignments that will affect Excel calculations.

PDF to Excel Add Columns

4.Rows

Like columns, the rows can also be customized. By clicking on Show Rows, you can see where the default rows in your file will appear.  Click on the Manual Row Editing box to activate the Add Rows and Erase Row Line functionalities, and you can start manually adding or erasing rows by left clicking.

PDF to Excel Add Rows

5. Header and Footer 

If your PDF file is a multi-page report that contains headers and footers, you can easily adjust them.  Click on either Edit Header or Edit Footer.  Adjust them by left clicking and holding the button down while moving the mouse up or down. You can also choose to enable or disable them, if needed, with the Header/Footer Options button.

PDF to Excel Headers and Footers

6. Show Preview

You can then preview the conversion output by checking the Show Preview box.  If you only need to preview page you’re working with, check the Only current page box. Your results will show up in the pane at the bottom.

 PDF to Excel Preview Pane

When converting your own banking statements or financial data, start exploring some of these features out.

Visit our Able2Extract support page for a detailed online version.