Top 8 Tools To Fact Check Your Research

Fact checking online research information

The Internet is everyone’s main source of information. People perform online searches all the time. One disadvantage of the Internet, though, is how easy it is to publish wrong information.

With fake news getting the spotlight in the past few years, we’ve been forced to be even more vigilant about how credible the information we’re reading about or writing on actually is. However, it’s also forcing us as readers to personally take an active part in learning how to read critically and how to do proper research.

The following list of tools (in no particular order) will help you fact-check your online research, whether it be a video, an image or an article. These tools will help you tell the difference between fact and fiction.

Continue reading →

How To Analyze Open Data With Able2Extract, Power BI And DataHero

There is a general sense of helplessness when it comes to analyzing public data, especially as people think it involves insane amounts of statistical mastery and in-depth knowledge of complicated statistical software.

This is especially nerve wracking for data journalists, who are keen on using data to write stories that can actually influence a certain aspect of our society, such as healthcare or education. Truth be told, analyzing data and storytelling actually go hand in hand.

Since the Open Data initiative started, more and more data sets have seen the light of the day on various data-related portals. The most interesting data sets for journalists are the ones who are publicly available, simply because they are free to use and analyze. Those data sets are available on a variety of online sources, such as: www.data.gov, open.canada.ca, data.gov.uk and many more.

Open data portals contain thousands and thousands of data sets, related to various branches of government: education, business, economy, crime, justice, healthcare and more.

Once you start exploring the online data, you will see that it usually comes in 3 main formats: HTML, XML and PDF.
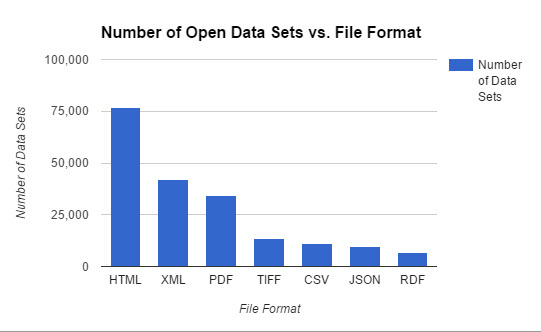
Common Open Dataset Formats

However, if you start investigating the data sets in more depth, you will quickly notice that there is only one format that’s present in almost every data set — the PDF. So, the logic goes that if you know how to analyze data that’s locked inside a PDF, you’ll know how to analyze any.

But what makes people want to store data in a non editable format?

First of all, when you save a data set as a PDF you are reducing its size, so it’s easier to store and upload to online databases. Secondly, since the PDF is not editable by default, you are making sure that no one tampers with your data and changes any of the ever-so-important numerical values. Remember, people spend countless hours gathering data and they are keen on protecting their hard work as much as possible.

So, once you find a PDF data set, where do you go next?

You now basically have only one option — you need to get that data into an Excel or CSV file format, while preserving source document accuracy as much as possible. After you do that, the next step would be to import that converted file into a data visualization tool of your choice, which we will cover later in this tutorial.

When it comes to exporting PDF data, the only tool in the market that has advanced enough PDF exporting capabilities is Able2Extract. That is because Able2Extract is not just a regular PDF converter. See, most (if not all) PDF converters on the market only convert PDF to Excel automatically, leaving you with a messy data set. The automatic conversion works good for one page invoices but converting a 1,000 page data set takes a lot more than that.

Able2Extract is the only converter that lets you fully customize your conversion by manually setting up row and column structure, prior to conversion. In addition it lets you preview the conversion results from within the software, which lets you export your data set as accurately as possible.

First, find your PDF data set. For this tutorial, we are going to use a practice data set containing all funded projects from Canadian Environmental Damages Fund. You can download it here.

Open the data set in Able2Extract and use custom PDF to Excel conversion to convert it to an Excel file. Set up row and column structure using the right side panel and make sure to check the “Preview conversion” box. Once satisfied, hit the convert button to send the data to Excel.
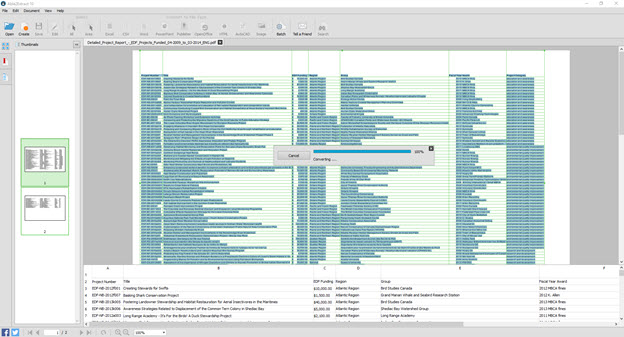
Able2Extract Custom PDF to Excel

So, we got our data from PDF and into Excel. Great job!  

The next step is to go to Excel and clean the data. This will take 15 minutes to 2 hours, depending on the data set, but the thing you are looking for in the end is to end up with data in the tabular format, which means there is a separate row for each record. It should look something like this:
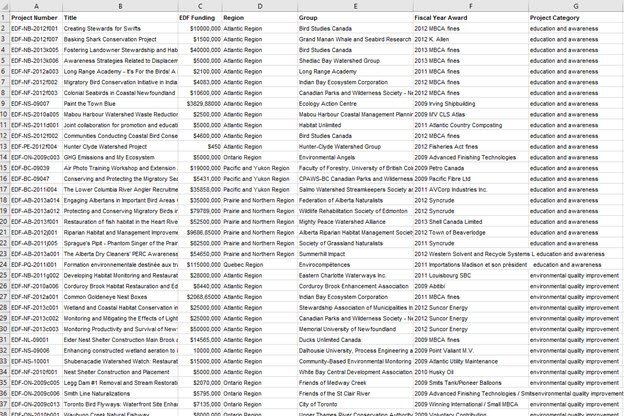
PDF to Excel Conversion Results

Make sure you don’t have any empty rows or blank cells and that all text is formatted in the same way. If there is a row with 3 cells missing it’s best to delete the whole row because it can mess up your end result and produce inaccurate results.

Now that we have a clean and tidy data set, it’s time to give life to these numbers and visualize them. Enter data visualization.

Data visualization simply means to create interesting charts from just plain data, which makes it easier to understand and present to your readers. When it comes to visualizing data you have an option between a desktop dataviz tool and a cloud dataviz tool. We will explore one example of both.

Our recommended desktop software for visualizing complex data is Power BI. We are recommending it because of its compatibility with Excel and the fact that it’s free to use for datasets up to 1 GB. You can download it here.

Before we start with Power BI, you will need to know that analyzing data starts by asking questions and then using data to answer them. For example, you can ask questions regarding our practice data set before we even upload it to the dataviz tool:

  • What was the EDF funding per region?
  • Which group received the biggest funding?

Depending on the data set, you can ask a 1000 questions and, make no mistake, you will get a 1000 answers. OK, let’s move on to more serious stuff. Power BI.

Power BI

Power BI is a Business Intelligence tool created for monitoring business performance and discovering market opportunities. Today we will use it as a data journalism tool in order to answer the two questions above.

Once you open Power BI you first click on Get Data > Excel > Connect > Your file.

Choose a sheet where data is located and press Load. Alternatively, you can press Edit if you’d like to check your data set for mistakes once again.

Once you do so, you will find a blank canvas and your data values on the right sidebar panel.

Accessing PowerBI Side Panel

These are the values we are going to slice and dice. Let’s try to answer our first question. If you remember, we wanted to know what was the EDF funding per region.

The basic data field there is EDF Funding so we’ll drag it into the “Values” box. The canvas immediately changes and it is now showing us the total EDF funding:
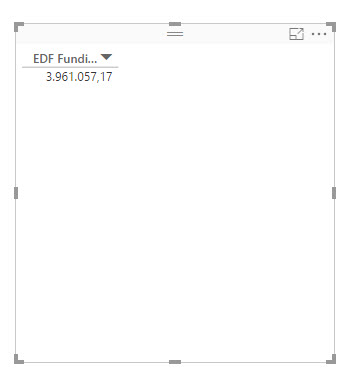
PowerBI EDF Funding Values

Let’s now introduce another data field. Select the “Pie chart”.
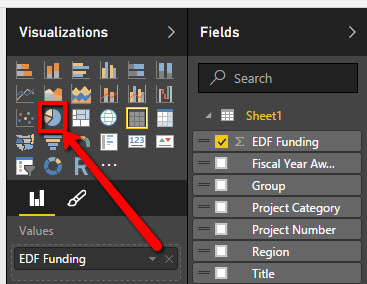
PowerBI Data Visualization Selection

Drag the “Region” field into the “Legend” box. Congrats, you made your first data visualization! We now have an overview of the funding per region and we can already start answering some questions.
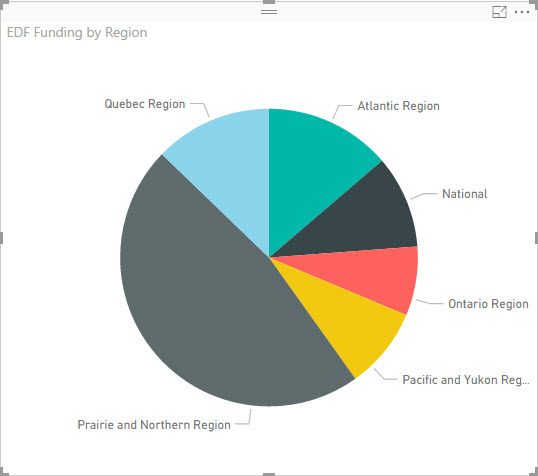
EDF Funding Visualization By Region

However, if you pay close attention you can see that we still don’t know the exact funding for each region. To show the exact values of data fields, go to “Format” panel:
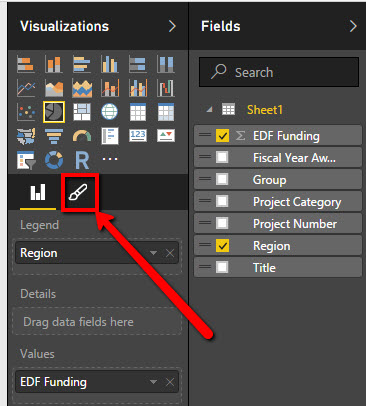
Accessing PowerBI Fromat Panel

Expand the “Detail Labels” category, find the Label Style and select “Both” from the drop down menu.
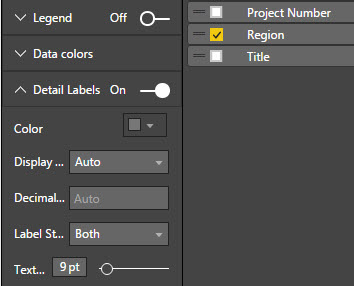
Selecting PowerBI Detail Labels

Our pie chart is now showing us the specific monetary values for each segment. Great, first question answered.
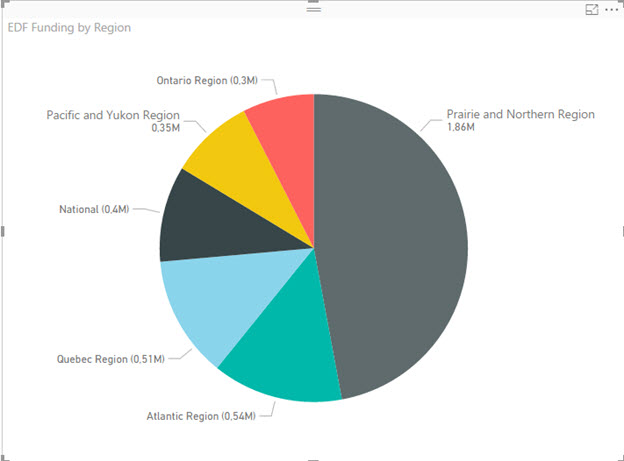
EDF Funding Pie Chart

OK, next up is to see which Group received the biggest funding. We’ll repeat the process but we’ll use a different chart, just to demonstrate different features of Power BI.

First, find and click on the Clustered Bar Chart.
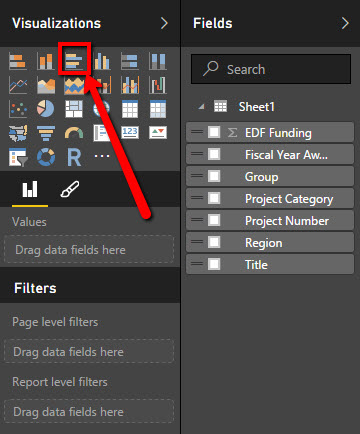
Selecting Clustered Bar Chart

Drag the EDF Funding into the Values box and drag the Group into the Axis box. Turn on the data labels and you’ll quickly see that the University of Waterloo received the biggest funding — almost $320,000

EDF Group Values Chart

Now that you know how to ask questions and visualize public data, we will now quickly go over another tool that can help you visualize your data in the Cloud. Have in mind that the Cloud tools only support lower file sizes, which means you’re best off using them for 10-20 page data sets. Luckily, the data set from our example is actually pretty small.

DataHero

DataHero is a cloud solution for Business Intelligence and data visualization. It allows you to connect files from numerous online and offline sources and it even has an integrated data cleaning tool, which is nice, but I do not recommend relying solely on it.

You can use DataHero for free, for files up to 2 MB in size. Anything larger than that, and you’ll probably have to pay a monthly subscription which is between $60 and $90. For this purpose, we are going to use a free plan.

Create an account, click on the Data tab and click on Import Data.

Importing Data With DataHero

Find your Excel file, select the sheet and upload it:
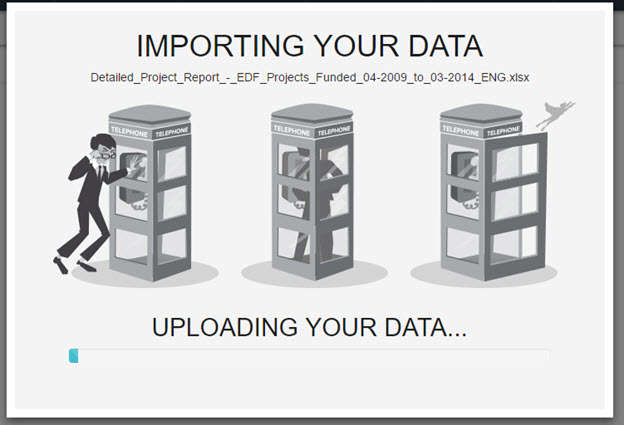
Uploading Data with Datahero

On the next screen, check formatting and proceed.

What’s cool about DataHero is that it automatically suggests data visualizations:

Suggested Visualizations From DataHero

I was originally interested in EDF Funding by project category so I’ll just create a brand new chart. DataHero uses the same drag & drop interface so it’s really easy to start using it.

First, drag the EDF Funding field onto the canvas.

PowerBI EDF Funding Values

Next, drag & drop the Project Category field.
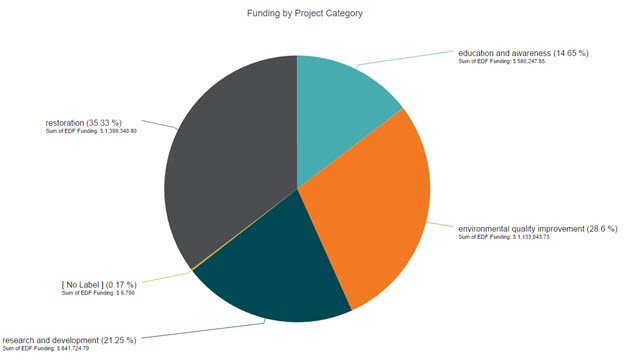
DataHero Pie Chart Visualization

As you can see, we received our answer. Most of the funding money (35%) went into Restoration projects and the rest  was dispersed equally between other three categories.

There are other, more complex, data visualization tools but we will stick with DataHero and Power BI for the time being as they offer the most features in their free plans.

Let’s recap the entire process of analyzing public data that’s archived in PDF:

  1. Find a relevant data set
  2. Use Able2Extract’s Custom PDF to Excel feature  to convert it to Excel or CSV
  3. Clean the data in Excel and remove blank rows and cells
  4. Visualize the data using a tool like Power BI or DataHero

By now you should have a clear understanding of the entire process of analyzing public data and should be well on your way to using it to shape the future of journalism. The strategy is simple — just upload clean, high quality data and play around with it until you get what you are looking for.

How To Turn Chrome Into A Notepad

How To Turn Chrome Into A Notepad

Among the many things you do online in a single day, we bet that taking down a note or two is somewhere at the top of your list. Was it for research? Recording a reference number? Brainstorming? Whatever the reason, having a scratch pad at arm’s length is a necessity.

One trick that can solve that problem—turn your browser into a note pad. It may sound odd, but it’s entirely possible. For this tip, we tried it in Chrome, and we have to admit that this is a neat little trick everyone should have handy.

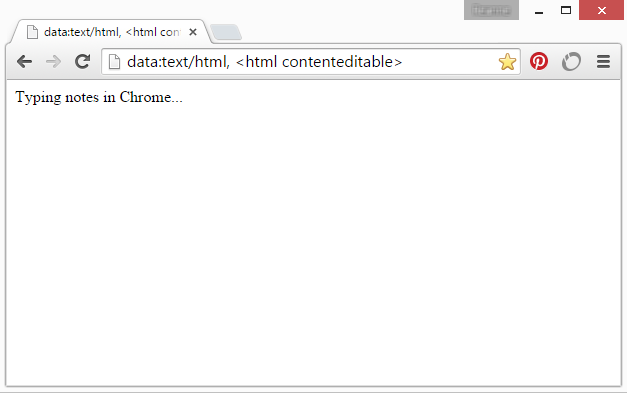
All you have to do is copy and paste this single line of code into your browser’s URL bar:

data:text/html, <html contenteditable>

Then hit enter. Click on the blank tab window that shows up and start typing away. Testing it on the latest Chrome build, it worked out great.  You can even bookmark the URL and call it up anytime for instant access.

Chrome Browser Notepad

This tip originally comes from Jose Jesus Perez Aguinaga, web engineer and Javascript developer, who shared this tip on his blog, Coderwall.com, a few years ago. And it still works.

Right off the bat, you can get a good idea of how this can make things easier for you while you’re on the web. As a writer, student or researcher, you can use this as a distraction free writing tool or quick text editor.

You don’t have to install a plugin or open another application. And without having to worry about any formatting frills, you can get in a good chunk of writing without having to leave the browser.

The one drawback, however, is that if you close the tab, you’ll lose all your notes. If you jot down reminders or to-do lists which you don’t need afterwards, then this shouldn’t be a problem.  In fact, it may even be convenient as you can skip over the usual dialog reminding you to save the file.

But if you do need those notes, then you can easily save them before closing the tab.  To do so, just use Chrome’s “Save page as…” function from the menu and save it as an HTML webpage. You should then be able to access the file in any browser.

If you hated the hassle of opening up a second app just to copy-paste or record something, try this out. This little trick will help simplify the process and speed things up.

5 Chrome Apps And Extensions Lawyers Should Be Using

Keyboard Law Technology

While it’s true that highly niched professionals like lawyers require a specific set of tools, sometimes something as simple as a Chrome add-on can be just as (or dare we say, even more?) powerful.

If you’re a lawyer looking for better, faster ways to get things done, working with Google Chrome can be a plus.  Whether you’re on the web for legal research, accessing databases, or working remotely outside of the office, Chrome offers a long list of apps and extensions to help improve the way you work.

And the right ones can make a world of difference.

So take your online productivity up a notch. A couple of these Chrome apps and extensions can speed up the most common and time consuming tasks.

Collect Online Evidence With WebPreserver

When you have cases involving social media harassment, incriminating posts, or cyberstalking, it automatically means spending hours online gathering screenshots. Not only that, but your research needs to be legally admissible. Luckily, there’s an extension for that: WebPreserver.

This Chrome extension will allow you to preserve, timestamp and authorize your findings with a single click. The extension links you to a web capture system designed for law firms and agencies to instantly create legally admissible evidence.

Research More Effectively On WestlawNext With Bestlaw

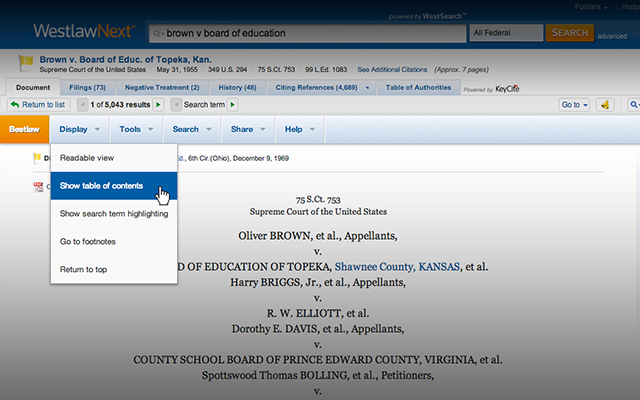
This next Chrome extension is centered upon offering you an expanded toolset to improve your workflow with WestlawNext. Bestlaw claims to add the features WestlawNext forgot.

WestlawNext Research Toolbar

Image Source: Bestlaw.io

Bestlaw does this by adding a toolbar to the document you’re reading. With it, you can copy Bluebook citations, generate table of contents, jump to footnotes, look up case information on Google and Wikipedia, share documents via email or social media and more.

Use Locate A Lawyer To Quickly Find & Consult With Other Lawyers

Looking for another lawyer? Use Locate A Lawyer  in your search. Developed by LawInfo.com, Locate A Lawyer can give you quick access from Chrome to its directory of pre-screened attorneys, all with verified qualifications and credentials. You can easily search by name, zip code, firm, and area of law.

Use Agilewords To Speed Up Legal Document Reviews

The review and approval process is necessarily a lengthy one at times, especially for legal documents that need feedback, editing, updating, and approval. For lawyers who need to collaborate on legal document, there’s Agilewords, the document reviewing tool you can access directly within Chrome.

This tool provides you with features such as real-time collaboration, secure uploading and hosting, revision tracking, online/offline editing, and the ability to audit your document’s access.

Instantly Look Up Citations From Webpages With Jureeka!

When researching a case, you may come across web pages with legal citations that appear throughout the article that aren’t hyperlinked. This Chrome extension can save you that hassle of toggling back and forth, looking up citation sources.  Jureeka! will turn those legal citations into hyperlinks as long as it is on a web page. So even if the author of the article does not link the citation, Jureeka! does.

5 Great Ways To Convert Text To Speech

​Audio Headphones Unplugged

As the school year starts up, you’re probably just getting yourself oriented with your classes and gauging the size of the workload you’ll have to deal with.

It may be daunting after a long lazy summer, but anticipating the amount of reading you have ahead of you is a good idea. It’s never fun to all of a sudden find yourself lagging behind. You need to get ahead of the curve way before the heavy reading assignments even start. And we have a perfect tip for that: to help lighten the reading load use a convert text to speech tool.

Converting speech to text can come in handy in so many ways.  It can free you up to get away from the screen for a bit or help you learn a language.  Also, students with disabilities can use text to speech tools to easily access digital content. Text to speech tools are perfect if you need help with proofreading, catching up on your notes, or getting some eBook reading done.

So here’s a look at 5 different ways to listen to your reading assignments with these free easy to use text to speech tools.

Listen to MP3 Files of Your Text with SpokenText

For those who need to catch up on reading while commuting, running errands, working out or multi-tasking, SpokenText is a straightforward online text to audio converter. SpokenText allows you to convert any number of files such as PDF, DOC, PPT, TXT, HTML and Emails to an MP3 file. Once you have your MP3 files are created, you can then download and put them onto a mobile device. You’ll be able to take your readings with you.

Have Online Documents Read Out Loud To You

Have a document online that needs to be proofread? If the file is shared on the web with a file sharing or collaboration tool like Google Docs, then you can have the text read to you directly from within your browser. You can listen for grammatical errors while working with other things on your computer–all without missing a beat.

SpeakIt! is available for Chrome and allows you to read text displayed in the browser. For FireFox, there’s Text to Voice which can also let you download your text in MP3 format.  And Opera users can try VozMe. Once any of these extensions are installed, just highlight the text you want read out to you and activate the plugin.

Convert Text From Multiple Sources With NaturalReaders

NaturalReaders is a popular text to speech tool whose online version comes with basic yet advanced features to get the job done. Click on Add Documents and you can start building and accessing your list of files from popular services like Dropbox, Google Docs, and more. Handy for students working on public computers or using Cloud services.

Get Social With Your Text On YAKiToMe!

People who are used to in browser music players will love the look and feel of YAKiToMe! It’s a free online text to speech service and network rolled into one where you can share your audio books and files with other YAKiToMe user groups. If you’re lucky, you may find a user with an audio version of a book you’re looking for.

Text to Speech Tool

YAKiToMe! lets you convert text from .doc, .pdf, .txt, .html, .xml, and email to speech. Choose a reader, a reading speed and an input method for uploading text: Field (copy-paste text directly), File, RSS, and Email. Then click on the Run Text To Speech button.

Convert PDF Text To Speech with PDF2Speech.com

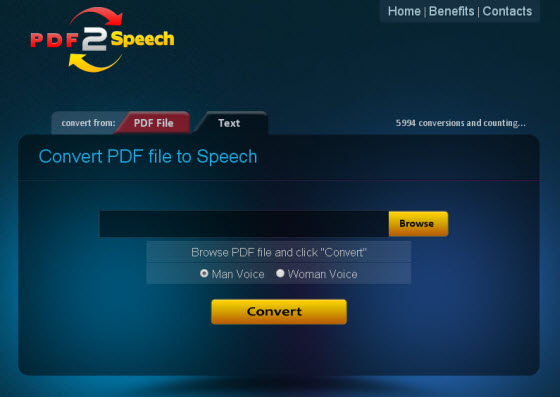
PDF2Speech is exactly what its name suggests. It’s a free online PDF to speech converter. This is perfect for professional and academic uses where PDF reading is a common task. On-screen PDF reading can sometimes be a chore, but listening to one doesn’t have to be.

Convert PDF to Audio

To use this tool, simply upload your PDF files to the site and hit the Convert button. This free service allows you to convert up to 20 pages which will allow you to get a good chunk of your readings checked off your list.

There are many simple yet powerful text to speech freeware tools to suit any occasion or need. The good news is that it doesn’t require a lot of money or any bloated text to speech download.