How To Export Open Office Files To Google Docs

Working via the cloud is unavoidable these days. Thanks to mobile devices, we’re finding more efficient ways of working while away from the office.  In fact, a common productivity habit these days is to send the document you’re working on to Google Docs so you can edit them from anywhere.

Well, if you’re using Open Office to create those documents, we’ve got a great productivity tip for you. In addition to helping you convert PDF to Open Office, we came across an Open Office extension that will let you instantly export your Open Office files to Google Docs: OpenOffice.org2GoogleDocs (OOo2GD).

OpenOffice.org2Google Docs is an extremely handy plug in that allows you to export, import and update your Writer, Calc, and Impress files to and from Google Docs.

The best part about this extension is that it simplifies the entire process and lets you do it right from within the Open Office suite itself. Take a look.

Installing OpenOffice.org2GoogleDocs

To start exporting your files, you’ll obviously need to install the plug in first.  To do so, follow these steps:

1. Download the OOo2GD extension by clicking on the Get it Now button. Save the extension to a location you will remember.

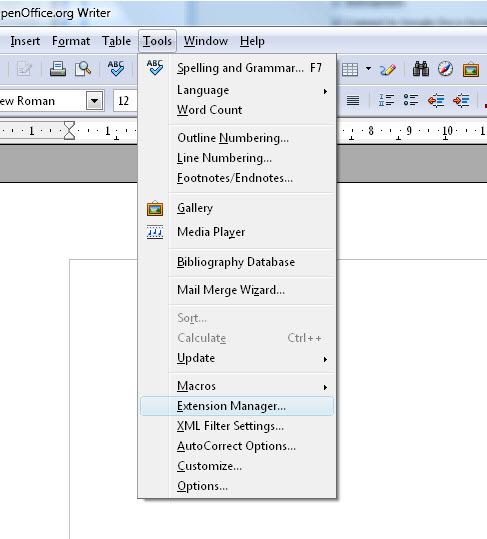
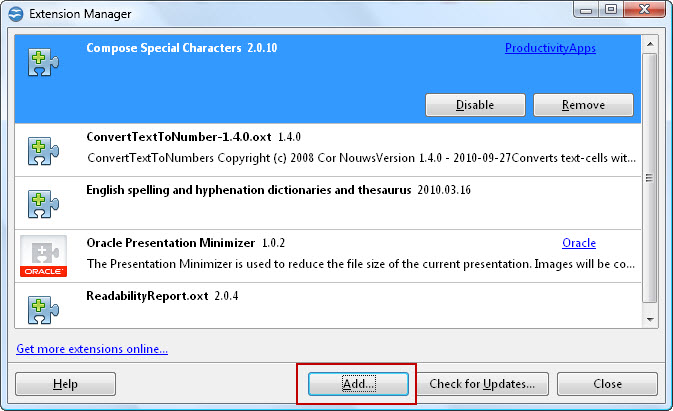
2. In Open Office Writer, go to Tools>Extension Manager…

Accessing OpenOffice Extension Manager

3. In the Extension dialog, click on Add. Then browse, locate and select the OOo2GD extension you saved in step 1.

Adding OpenOffice Extensions

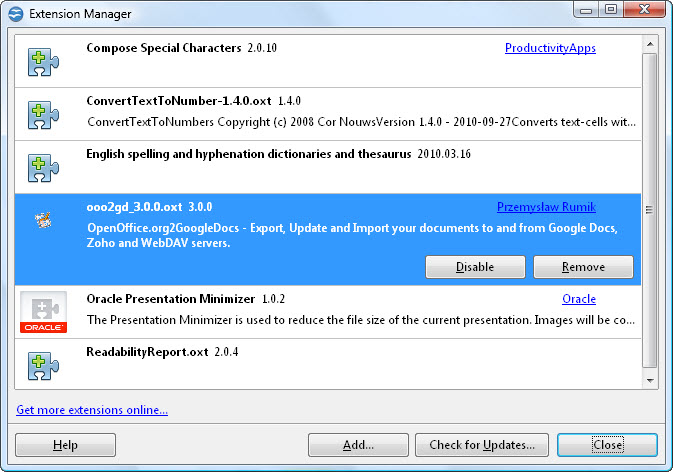
Once installed you should see it enabled in the extension list:

OOo2GD Toolbar AddOn

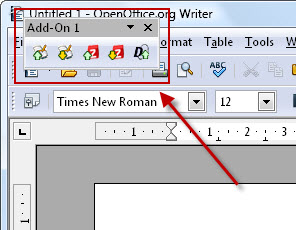
4. Restart Open Office. You’ll find the OOo2GD Add-On ready for you to add to your regular toolbar for quick one-click access to the functionality. Place it on your toolbar by clicking and dragging it to an empty spot on your toolbar.

OOo2GD Toolbar AddOn

Note: This is toolbar is optional. You can also access the functionality via File > Google Docs & Zoho.

How To Export Your Open Office Files to Google Docs

Now that you have the extension installed, you’re ready to start exporting your files to Google Docs. We put a quick step-by-step tutorial to help guide you through the process. To export your Open Office document,

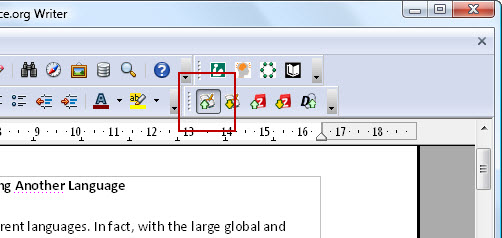
1. Open the file you wish to export and click on the Export to Google Docs button:

Exporting OpenOffice to GoogleDocs

2. In the pop up dialog, enter your Google Docs Account credentials

Entering GoogleDocs Credentials

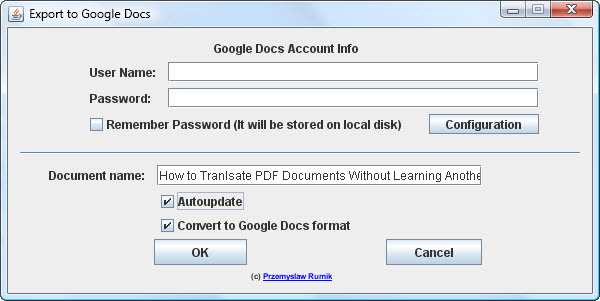
3. Select Convert to Google Docs format and Autoupdate. This will allow you to automatically set your file up for syncing and editing within Google Docs.

4. Click on OK.  OOo2GD will then start uploading your file to your Google Drive.

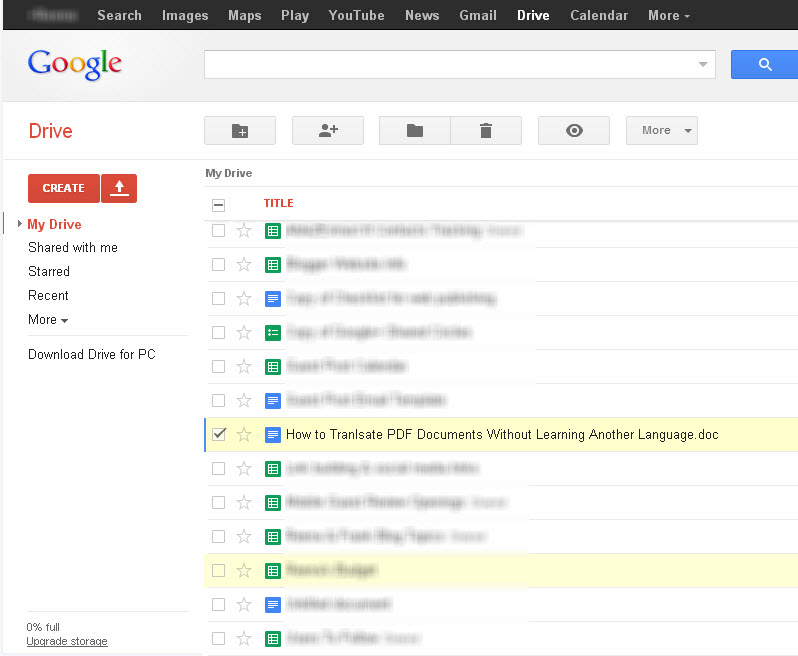
5. Sign into your Google Drive account and locate the file

OpenOffice file in GoogleDrive

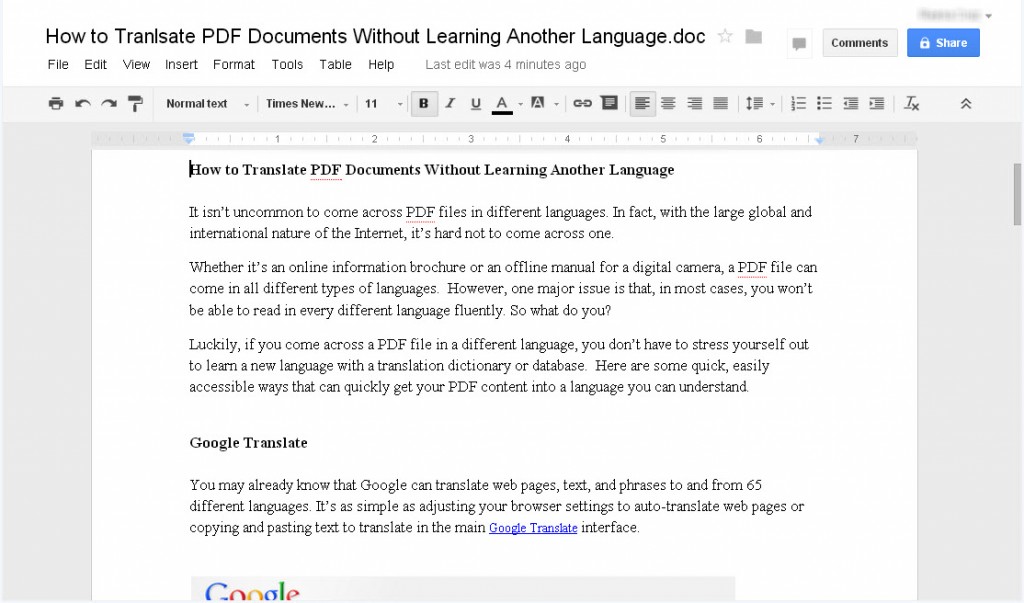
6. Click to open the file and you can then edit the document as needed within Google Docs

Editing OpenOffice in GoogleDocs

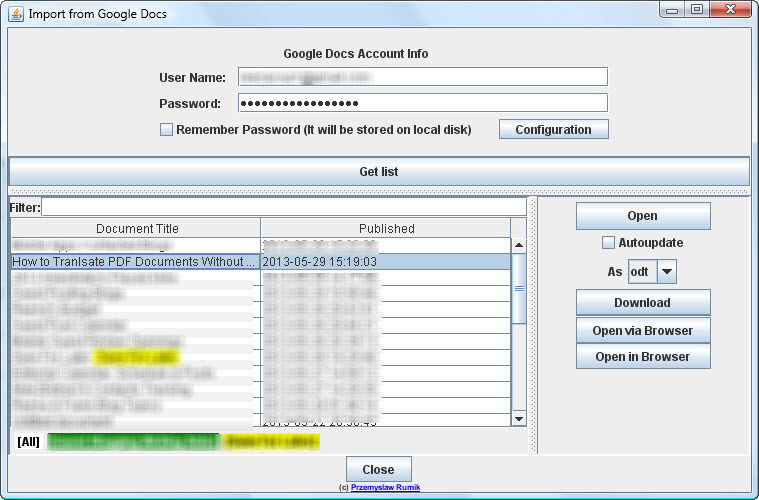
You can also quickly import Google Docs into Open Office in a similar manner. After clicking on Import to Google Docs, just input your credentials, click on Get list and you can select which file you want imported. Click on Open. 

Importing GoogleDocs to OpenOffice

This extension is perfect and convenient for worker bees who need to take their work home with them. It eliminates the hassle of a USB key and toggling back and forth between saved copies.  Do you have a favourite OpenOffice extension yourself? Which one helps you out the most?

Able2Extract 8 Tip: How To Get Accurate Excel Spreadsheet Calculations During Tax Season

Using Excel is a great way to keep things organized during tax season.  The popular spreadsheet program has advanced features that let you work with your financial data as accurately as possible.

And that’s important.

Half the battle for tax filers every year is making sure that the numbers on those tax forms are correct.  The nitty-gritty calculations can be especially tedious if those numbers are generated from PDF conversions.

Fortunately, Able2Extract can refine the conversion process right down to the cell content.  Honourably mentioned by AccountingToday.com, the PDF converter was recognized for its PDF to Excel spreadsheet conversion and aiding in auditor control.  Now it’s time for you to get that same control over your taxes.

Introducing Able2Extract’s MS Excel Conversion Parameters

On top of the custom PDF to Excel conversion features you already know about, you can take advantage of conversion parameters to ensure that the converted PDF data falls in line with your tax spreadsheet analysis right from the start. The following options are located under View > Options…

PDF to Excel Conversion Parameters

Reposition The Minus Sign

In certain financial documents or reports, the minus sign symbol trails to the right of the number that it is associated with (e.g. “4,560-“ instead of “- 4,560”). Converting negative numbers where the minus sign trails to the right of the number can cause the resulting conversion to Excel to place these numbers as text, rather than numbers.  Move those trailing minus signs to the beginning of the number by selecting the Trailing Minus Sign Treatment. This will prevent it from being converted to textual items in Excel.

Keep The Dollar Sign Separate

Certain financial documents may contain dollar signs. Unfortunately, sometimes the dollar sign ($) creates a challenge in the way the program interprets column structure. Thus, the default is to meld the dollar sign into the same column as the number next to it.

PDF to Excel - Retaining the Dollar Sign

But if you wish to retain the dollar sign in its own separate column, check the Retain Dollar Sign as Separate Symbol option before converting.  Excel will treat the sign in the column as text.

Work With European Numeric Formatting

There are cases where some countries use European number formatting (1.234.567,89 vs. the North American equivalent written out as 1 234 567.89). However, PDF data in this format may be incompatible with your auditing tools or with some region specific versions of Excel.

You can change this easily with Able2Extract 8.  By selecting the European Continental Settings option, you can convert documents that adopt the decimal comma and “period” thousand separators to Excel formatted numbers correctly.

Display Your Data Differently

Sometimes you may need tabular data displayed differently to focus on specific areas.  For example, you may want to interpret data in terms of weekly revenue rather than by product.

PDF to Excel - Enable Table Unfolding

To transpose the data and move the data in columns to rows and the data in rows to columns, use the Enable Table Unfolding option. When selected, Able2Extract will generate output from a PDF in column structure to Excel in row structure or vice versa.

Enable Table Unfolding

Rotate Text into Excel

With pesky PDFs you may come across text in a table that has been rotated in a certain direction which would pose a problem for existing formatted Excel spreadsheets. Checking the Rotate Text into Excel box in the options menu will convert the rotated text into Excel upon conversion.

Just keeping a few of these options in mind can greatly lower the amount of stress you’re already going through with tax season. After all, it’s the simplest adjustments that can mean the difference between getting severely audited and getting a healthy tax return.

How To Convert Your Facebook Data To PDF With Sonic PDF Creator 3.0

Facebook is the number one site where you probably spend most of your time online. Undoubtedly, the comments, messages, photos, and videos you post up end up accumulating into one big online scrapbook of your best and most memorable moments in life.  It isn’t any wonder then that you would want to preserve that content offline and onto your computer?

While the videos and photos you have posted up might already be on your computer, there are some related bits, like the notes, comments, Wall posts or Facebook messages, which aren’t.

In fact, one of our PDF Creator Facebook app users was wondering if there was a way in which she could download and get all of her Facebook messages into PDF format.

If you want to download your Facebook data into a PDF file, here’s a detailed and slightly altered step-by-step version of the solution we put together and which you can try out for yourself.

1. Log into your Facebook Account

2. Go to Account Settings

3. Under General settings, click on the “Download a copy” of your Facebook data link below your personal information settings.

Download Facebook Data

You’ll then get an overview of what information will be archived and which won’t. 

4.  Click on the Start My Archive button and confirm your download. This process may take a while depending on how much data you have. Facebook will send you a link to download your archive file via email.

 Facebook Data Notification

As Facebook notes, all the data contained on your Facebook profile will be downloaded into one single archive.  However, you will get the chance to choose which folder and data you can convert later on.

5. Check your email for the link and click on it to reconfirm your password. Download and save the zipped file to your computer.

Facebook Data Confirm Download

6.  Extract all files from the zipped folder into a folder or location you can easily access.  It contains the individual files of your data– photos, videos, and web-based content.

To access your messages, go to HTML> Messages file.

HTML file

Double click to open the Messages file in your browser to make sure all the content you want is there.

Facebook Data Massages HTML File

To convert this data into the PDF format, you can use Sonic PDF Creator 3.0 to convert  HTML to PDF.

7. Once installed or if you have the program already, open Sonic PDF Creator and click on the Create PDF From File icon on the command toolbar.

8. Click on the Browse button.  Select and upload your Messages HTML file.

9. Click the Create PDF button. This should start the conversion process.

Create PDF From File

Once your Facebook data conversion is done, you can then add whatever PDF features you want to the file. Add a password, headers, footers, watermarks or bookmarks. When you’ve added all you want, simply save your PDF file in a location of your choice.

This process can work for any of the HTML data files you have in your archive. It’s an easy way to keep or reuse your Facebook content in a secure manner while customizing the file to your needs. Give it a try.

If you have another way of saving and preserving your Facebook data, let us know in the comments below!

How to Translate PDF Documents Without Learning Another Language

Translating PDF files in different languages

It isn’t uncommon to come across PDF files in different languages. In fact, with the large global and international nature of the Internet, it’s hard not to come across one.

Whether it’s an online information brochure or an offline manual for a digital camera, a PDF file can come in all different types of languages.  However, one major issue is that, in most cases, you won’t be able to read in every different language fluently. So what do you?

Luckily, if you come across a PDF file in a different language, you don’t have to stress yourself out to learn a new language with a translation dictionary or database.  Here are some quick, easily accessible ways that can quickly get your PDF content into a language you can understand.

Google Translate

You may already know that Google can translate web pages, text, and phrases to and from 65 different languages. It’s as simple as adjusting your browser settings to auto-translate web pages or copying and pasting text to translate in the main Google Translate interface.

Google Translate PDF Translation

Well, translating PDF content with Google is just as simple. Once you’re on the main Google Translate page, click on the  translate a document hypertext link under the main text field.  You’ll get the above interface where you can click on Choose File to upload your PDF and select your target language.

However, one thing to note is that this tool is geared only towards translating the textual content; formatting and images aren’t preserved. Thus, you can expect this to work best when you need to translate and interpret large sections of text. When the translation process is done, your converted text will be available in a new tab in your browser.

Google Docs

While the above method doesn’t require a Google account, it’s quite possible that you already have one. If you do, and are already an avid user of Google Docs, then you can easily take advantage of its Translate Document functionality and use it on your uploaded PDFs.

Provided that your PDF was imported into Google Docs by selecting all the Upload settings to convert it to the Google Docs format (displayed when you upload a document), you should be able to open your PDF in the main editing interface with the main menu and formatting toolbars.

How to translate PDF file

With your PDF open in Google Docs, click on Tools and select Translate Document. You can then choose your desired language and click on Translate. The results will be generated in a new PDF file with both the original and translated versions included.

DocTranslator

Doc Translator Logo

Though the many ads on the site and interface may put you off, DocTranslator has a solid database, using the Google Translate service to process your textual content and containing translation support for more than 50 languages.  To boot, the site offers translation for a handful of popular formats without file size restrictions, including the PDF format.

Keep in mind that this tool should only be used for translating PDF content that isn’t sensitive, confidential, or in need of any sort of security at all (files such as manuals, brochures, fliers, etc.). The fine print on their privacy statement mentions that it doesn’t include PDF files. So you’ll have to use your own discretion on which PDF content you want translated.

Doc Translator PDF

To access the PDF translation app, click and select the PDF option on the homepage, and you’ll be able to upload your PDF and choose your target language.  In contrast to Google Translate, DocTranslator  works towards retaining the formatting and layout of the file, though your results may vary.

Investintech How-To Tip: Create A Handout From A PDF Document

Last week, we gave you a couple of tips on how to incorporate a few of our tools into your daily study grind. Those were tools you could seamlessly fit into your existing list of handy resources to help you get your work done.

But for the most part, as a student, you’ll be using digital documents as a  major resource that can, indeed, make  your school work  (and learning) much easier. Yet, the only real problem is getting those digital documents to suit your needs.  As they are, they may be difficult to use.

In fact, one tweeter had this exact problem:

PDF to Powerpoint Help
http://twitter.com/#!/tiff_FlOCKA/status/114816270674825217

Students are no stranger to PDF PowerPoint notes from a professor, nor are they strangers to the obstacles they pose. Luckily, Sonic is up for tackling such a task.

Sonic PDF Creator has a feature that lets you combine those multiple PDF pages onto a single page for quick overviews that are perfect when it comes to group studying, delivering presentations, or providing more compact resources.

If you’re unsure of how to get started, here’s a look at the handout creation options in Sonic that will let you format your PDF content into a handout.

1. Open your PDF file in Sonic PDF Creator

2. Go to Tools > Create Handout . . . .  You’ll be given the n-Up Pages dialogue box where you can then customize and create your own handout.

Create Handout
3. Select the paper size of the handout

Paper Size

The very first thing to consider is the paper size and the orientation.  Each PDF is different and no single handout formatting is a one-size-fits-all deal.  Deciding which one is right for your content is easy.

From the drop down boxes you can choose from a wide range of paper sizes for your printed handout (including popular sizes: A4, Legal, 11×17, etc.).  Then designate whether your pages will be in portrait, landscape, or Auto (according to custom width and height, which you can set manually).

4. Set the scale for  your handout pages

Scale

When dealing with scaling options, you get to assign how those PDF pages will fit onto the page of your printed handout, whether letter size, legal, or 11×7.

The Auto feature lets Sonic calculate how to fit those PDF pages according to the paper size you selected. If you’d like to use the original size of the page, select Use Original Size. Or if you’d like to set the scale of your PDF content yourself, you can easily designate the width and height yourself.

With the Proportionally box checked, your destination area on the handout will remain proportional to the original page size.

5. Decide on the layout

Layout

Now that you have the content scaled down to the paper size and orientation you’ve selected, you get to decide the layout of that content.

When creating your layout first make sure you decide on the measurement unit (point, inch, or mm) you need Sonic to use in order to accurately space the content for your handout.

For the layout, you can designate a different number of PDF pages per column and row along with the margin spacing around them. The gutter measurements (in case you need to bind the handout) can easily be customized to any length you wish.

You can then designate how many pages you want repeated in the hand out and the order of the pages.  Note that if the pages of your original PDF content are numbered, depending on your column/row layout and if you want double sided pages, you may want to carefully plan out how your pages can be effectively ordered.

When deciding on the order of the pages, you have 3 options:

Across: Runs from left to right, then top to bottom.
Down: Runs from top to bottom, then left to right.
Stack: Runs from top left of each page, then to right, then to next row.

6. Draw crop marks on your handout pages

Crop Marks

Crop marks can also be drawn onto the handout. You can choose from drawing crops in the corners, center, or both (with the Draw Crop Marks option). After you decide which crop marks you want, you can adjust  and customize them manually.

7. Allow for bleed allowance

Bleed Allowance

 For handouts that will need cutting, the Bleed Allowance options will let you specify your own measurements to allow for any deviations in cutting the paper to the finished page size.

You can choose from :

None: No bleed allowance.
From original PDF: Use the bleed information from the original PDF file.
Specified: User specify the bleed allowance amounts.

8. Once all your settings in place, click on OK . Sonic will generate a preview of the new handout for you.

9. If all looks okay, you can then save it using the Save or Save As options under the File menu, and then print it out.

If you created a handout with Sonic PDF Creator before, which creation options did you use to  make your PDF content look like a professional handout?