How To Install Able2Extract 8 On Ubuntu

Right now, open source is on the rise, and adding to the already growing list of Ubuntu supporters is China. Canonical, the company behind Ubuntu, has been collaborating with the Chinese government to develop a standardized operating system known as Ubuntu Kylin, which will be released later this week on Thursday.

Ubuntu already offers a Chinese Edition of the OS, but Ubuntu Kylin will be a new version significantly aimed at supporting how Chinese people work on computers. Among other things, it will integrate pre-installed localized tools, offering easy access to web services and software they commonly use right from the Dash.

This is great news for the open source community and Chinese users looking for alternatives they can start using effortlessly.  If this latest development has you wanting to find out more about Ubuntu before the big day arrives, this is certainly a perfect time to test it out.

Able2Extract 8 For Ubuntu Users

Well, for all you Able2Extract users wanting to switch over—or for those who need a PDF converter on Ubuntu, we have just the thing. We put together a quick tutorial on how to install Able2Extract 8 on the open source system.  With Able2Extract 8 you can convert PDF to Open Document Formats and more.

This tutorial was written using Ubuntu 12.10. For instructions on installing the latest version, visit Ubuntu’s Installation Help page.  Once you have it installed and all set up, follow these steps.

1. Go to the Investintech.com site and download the latest version of Able2Extract 8 for Ubuntu.

2. Click on Open with Ubuntu Software Center.

Download installation file

3. Access the installation file through your dashboard. Click on Install.

Installing Able2Extract

If you have a password for administrative purposes, enter it in and authenticate the installation to continue.

Authorizing Able2Extract Installation

4.  When the installation is complete, accept the terms of the End-User License Agreement to get started with Able2Extract 8 on your computer.

Accept Able2Extract EULA

And that’s all there is to it!

Converting PDF on Ubuntu

Will you make the switch to Ubuntu or try Ubuntu Kylin?  Jump in on our Google Plus discussion on this topic and let us know your take on the latest development.

Able2Extract 8 Tip: How To Get Accurate Excel Spreadsheet Calculations During Tax Season

Using Excel is a great way to keep things organized during tax season.  The popular spreadsheet program has advanced features that let you work with your financial data as accurately as possible.

And that’s important.

Half the battle for tax filers every year is making sure that the numbers on those tax forms are correct.  The nitty-gritty calculations can be especially tedious if those numbers are generated from PDF conversions.

Fortunately, Able2Extract can refine the conversion process right down to the cell content.  Honourably mentioned by AccountingToday.com, the PDF converter was recognized for its PDF to Excel spreadsheet conversion and aiding in auditor control.  Now it’s time for you to get that same control over your taxes.

Introducing Able2Extract’s MS Excel Conversion Parameters

On top of the custom PDF to Excel conversion features you already know about, you can take advantage of conversion parameters to ensure that the converted PDF data falls in line with your tax spreadsheet analysis right from the start. The following options are located under View > Options…

PDF to Excel Conversion Parameters

Reposition The Minus Sign

In certain financial documents or reports, the minus sign symbol trails to the right of the number that it is associated with (e.g. “4,560-“ instead of “- 4,560”). Converting negative numbers where the minus sign trails to the right of the number can cause the resulting conversion to Excel to place these numbers as text, rather than numbers.  Move those trailing minus signs to the beginning of the number by selecting the Trailing Minus Sign Treatment. This will prevent it from being converted to textual items in Excel.

Keep The Dollar Sign Separate

Certain financial documents may contain dollar signs. Unfortunately, sometimes the dollar sign ($) creates a challenge in the way the program interprets column structure. Thus, the default is to meld the dollar sign into the same column as the number next to it.

PDF to Excel - Retaining the Dollar Sign

But if you wish to retain the dollar sign in its own separate column, check the Retain Dollar Sign as Separate Symbol option before converting.  Excel will treat the sign in the column as text.

Work With European Numeric Formatting

There are cases where some countries use European number formatting (1.234.567,89 vs. the North American equivalent written out as 1 234 567.89). However, PDF data in this format may be incompatible with your auditing tools or with some region specific versions of Excel.

You can change this easily with Able2Extract 8.  By selecting the European Continental Settings option, you can convert documents that adopt the decimal comma and “period” thousand separators to Excel formatted numbers correctly.

Display Your Data Differently

Sometimes you may need tabular data displayed differently to focus on specific areas.  For example, you may want to interpret data in terms of weekly revenue rather than by product.

PDF to Excel - Enable Table Unfolding

To transpose the data and move the data in columns to rows and the data in rows to columns, use the Enable Table Unfolding option. When selected, Able2Extract will generate output from a PDF in column structure to Excel in row structure or vice versa.

Enable Table Unfolding

Rotate Text into Excel

With pesky PDFs you may come across text in a table that has been rotated in a certain direction which would pose a problem for existing formatted Excel spreadsheets. Checking the Rotate Text into Excel box in the options menu will convert the rotated text into Excel upon conversion.

Just keeping a few of these options in mind can greatly lower the amount of stress you’re already going through with tax season. After all, it’s the simplest adjustments that can mean the difference between getting severely audited and getting a healthy tax return.

Customizing Your PDF To Word Conversions With Able2Extract 8

With Able2Extract 8 there were a few changes in layout that may have had you wondering if Able2Extract backtracked and scaled back on its PDF to Word options.

It hasn’t. Able2Extract’s PDF to Word conversion options are still there and still fully functional.

Obviously, how you work with MS Word will constantly change—as will your editing needs.  After last week’s release of MS Office 2013, for instance, you may already be exploring new features, taking advantage of MS Word 2013 and all it has to offer.  Well, Able2Extract is no stranger to MS Word, and it’s for updates like those that we continue to include Able2Extract’s variety of  PDF to Word options.

So this week we bring them to the forefront to show you what our PDF to Word variety is all about and how each option can accommodate how you work within MS Word.

In Able2Extract 8, the PDF to Word conversion options can be found within the File menu under the Convert to Word… conversion command. Hover over it to expand the menu. The options will be activated once your content is selected for conversion:

Able2Extract PDF to Word Options

Convert to Word- Standard

We always have this as the default and recommended PDF to Word conversion option. This is because it offers the most accuracy and editability for MS Word documents. 

Able2Extract PDF to Word Standard

A PDF to Word Standard conversion will retain background graphics, as a background image in the converted output, and the textual layout using the layout of the original PDF document for guidance.  For most documents, this will provide the best looking output for general purposes and quick conversions.

Convert to Word- Frames

Though it will preserve content just as well as the Standard conversion, the Frames option will give you slightly different results.  The converted PDF to Word output will retain the background graphics and layout of the selected pages and items, but with the text appearing in individual text boxes in a new Word document, like so:

Able2Extract PDF to Word Frames

This conversion is ideal if you prefer or need to work with text boxes which can be moved within a document. For instance, if the placement of text and graphics are a priority, as it is in publications, converting PDF content into frames will  let you position and re-position your content around easily.

Under certain circumstances, because the text boxes are designed to correlate with the structural positioning of the original PDF document, it may be possible to generate a more accurate layout than with the Standard conversion selection option.

Convert to Word- Text

As the name suggests, the Convert to Word -Text conversion option will only convert the text portions of selected items. The text will appear as a standard paragraph without special formatting or text boxes in a new Word document.

Able2Extract PDF to Word Text

This conversion is most useful when working with textual information takes priority over preserving the look and feel of your content in Word. You can easily avoid transferring over  images or graphics that aren’t needed. As you can imagine, this can save you a lot of time spent on cutting or deleting them post-conversion.

Specifying Your MS Word Output

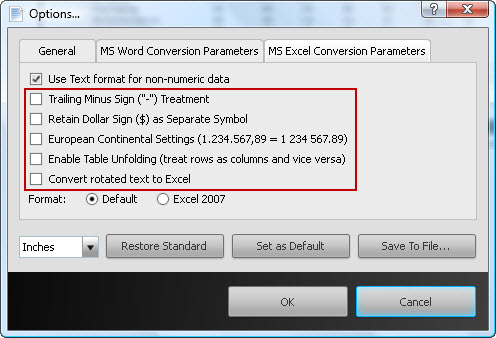
In addition to customizing your conversion results, you can also change the PDF to Word output format with a few clicks.  You can do this by accessing Able2Extract’s conversion settings by going into the View menu and selecting Options… :

Able2Extract PDF to Word Output Format Options

The Word conversion output offers 3 different output formats when converting a PDF to Word. You can select any of the 3 options:

Default: Using this setting on the Windows platform will result in the software automatically detecting which version of Word is installed on the machine and then saving the Word output into the applicable format – .docx or .doc.

RTF: Choosing this setting means that all conversion that are made from PDF to Word will be saved in the rich text format (.rtf) extension.

Word 2007: Using this setting means that all documents converted into Word will be saved as .docx regardless of which version of Word is installed.

Implementing just a few of these options and settings can help save you some major editing time. Though a Standard conversion is probably sufficient for general purposes, it’s always good to try and get the most out of your PDF to Word conversions wherever possible. With the growing complexity of Word documents, you can’t afford not to!

How To Convert Your Facebook Data To PDF With Sonic PDF Creator 3.0

Facebook is the number one site where you probably spend most of your time online. Undoubtedly, the comments, messages, photos, and videos you post up end up accumulating into one big online scrapbook of your best and most memorable moments in life.  It isn’t any wonder then that you would want to preserve that content offline and onto your computer?

While the videos and photos you have posted up might already be on your computer, there are some related bits, like the notes, comments, Wall posts or Facebook messages, which aren’t.

In fact, one of our PDF Creator Facebook app users was wondering if there was a way in which she could download and get all of her Facebook messages into PDF format.

If you want to download your Facebook data into a PDF file, here’s a detailed and slightly altered step-by-step version of the solution we put together and which you can try out for yourself.

1. Log into your Facebook Account

2. Go to Account Settings

3. Under General settings, click on the “Download a copy” of your Facebook data link below your personal information settings.

Download Facebook Data

You’ll then get an overview of what information will be archived and which won’t. 

4.  Click on the Start My Archive button and confirm your download. This process may take a while depending on how much data you have. Facebook will send you a link to download your archive file via email.

 Facebook Data Notification

As Facebook notes, all the data contained on your Facebook profile will be downloaded into one single archive.  However, you will get the chance to choose which folder and data you can convert later on.

5. Check your email for the link and click on it to reconfirm your password. Download and save the zipped file to your computer.

Facebook Data Confirm Download

6.  Extract all files from the zipped folder into a folder or location you can easily access.  It contains the individual files of your data– photos, videos, and web-based content.

To access your messages, go to HTML> Messages file.

HTML file

Double click to open the Messages file in your browser to make sure all the content you want is there.

Facebook Data Massages HTML File

To convert this data into the PDF format, you can use Sonic PDF Creator 3.0 to convert  HTML to PDF.

7. Once installed or if you have the program already, open Sonic PDF Creator and click on the Create PDF From File icon on the command toolbar.

8. Click on the Browse button.  Select and upload your Messages HTML file.

9. Click the Create PDF button. This should start the conversion process.

Create PDF From File

Once your Facebook data conversion is done, you can then add whatever PDF features you want to the file. Add a password, headers, footers, watermarks or bookmarks. When you’ve added all you want, simply save your PDF file in a location of your choice.

This process can work for any of the HTML data files you have in your archive. It’s an easy way to keep or reuse your Facebook content in a secure manner while customizing the file to your needs. Give it a try.

If you have another way of saving and preserving your Facebook data, let us know in the comments below!

Exploring Able2Extract 8’s New PDF To Excel Custom Conversion Panel

We all know that when it comes to converting PDF tables, nothing comes out right.  Regular conversions aren’t enough.  Transferring digital banking statements or invoices into your tracking or budget spreadsheets becomes difficult when that information comes in tables of different shapes and sizes.

Sometimes the best way you can ensure an accurate PDF to Excel conversion is to literally move the columns and rows yourself before the conversion takes place. And this is where Able2Extract comes in.

With this latest version, the PDF to Excel custom conversion panel received a facelift.  And did it ever!  This new interface is now more intuitive and user-friendly than ever.  Functions and features are now at your fingertips.

To help get yourself familiar with the new conversion panel, here’s a basic FYI overview of what you can do with each feature. 

PDF to Excel

1. Page Range

With this section, you can designate a page range for applying and customizing the file’s table structure.  Add additional pages with the Expand… option or use the Exclude functionality to eliminate a page within your selected range.

2. Tables

Using the tables section, Able2Extract allows you to Add and Delete tables to a page by left clicking on it. Select the Replot functionality and Able2Extract will recalculate the column structure for the page range.

3.Columns

With your tables set, you can then edit their structure. Select either the Add Columns or Erase Column Line to start customizing your tables.   You can then click on your spreadsheet to insert where you want your column lines or click on the ones you want to delete. This is perfect for correcting column misalignments that will affect Excel calculations.

PDF to Excel Add Columns

4.Rows

Like columns, the rows can also be customized. By clicking on Show Rows, you can see where the default rows in your file will appear.  Click on the Manual Row Editing box to activate the Add Rows and Erase Row Line functionalities, and you can start manually adding or erasing rows by left clicking.

PDF to Excel Add Rows

5. Header and Footer 

If your PDF file is a multi-page report that contains headers and footers, you can easily adjust them.  Click on either Edit Header or Edit Footer.  Adjust them by left clicking and holding the button down while moving the mouse up or down. You can also choose to enable or disable them, if needed, with the Header/Footer Options button.

PDF to Excel Headers and Footers

6. Show Preview

You can then preview the conversion output by checking the Show Preview box.  If you only need to preview page you’re working with, check the Only current page box. Your results will show up in the pane at the bottom.

 PDF to Excel Preview Pane

When converting your own banking statements or financial data, start exploring some of these features out.

Visit our Able2Extract support page for a detailed online version.