How to Attach A PDF File To Microsoft Word Documents

Document Attachment

Digital documents are the number one staple behind any company or workflow.  And everyone shares them whether by email, cloud services, or URL. But do you ever wonder if there’s an even easier way to bundle your documents together? Short answer: yes, there is.

Attaching or embedding PDFs in Word documents can be an even quicker alternative than email attachments. It’s also a dead simple way to combine PDF and Word content together.

Think of PDF documents that contain file attachments. You have everything you need in that one single file and there’s no need to go back to the email for the other attachments.  Doing the same with a Word document can be just as convenient. It can be helpful in situations where you need to:

  • Attach legal PDF documents as an appendix
  • Quickly access PDF forms, reports, contract terms, or brochures
  • Provide extra working drafts or updates to colleagues in business  proposals
  • Access or provide PDF resources as reference for papers you’re writing

Embedding a PDF document within MS Word is a popular and sought-after tip. With digital documents becoming more important these days, it’s a handy and helpful method to keep in mind.

To keep highly related PDF and Word files neatly together, follow these steps:

In Microsoft Word, place your cursor where you’d like the PDF to be located. Then,

1. Go to the Insert tab > Object.

Selecting Insert Object

2. In the Object dialog, go to the Create from File tab

Embedding Object Word Document

3. Click on Browse. Search and select the PDF file you wish to embed.

4. Select Display as icon and leave Link to file unchecked. You can choose to change the icon if you wish.

5. Click on OK.

PDF Embedded Word File​

As you can see, the PDF appears right inside your Word document, and can be opened in your PDF viewer of choice. Know of any other methods for combining Word and PDF files together? Let us know!

AutoCAD Tip: Recover Vector Graphics and Text Locked in PDF

As a professional AutoCAD designer, you can deal with any number of CAD drawings on a daily basis that need your attention.  Yet the review process might not always be in an easy, straightforward manner.

The work process is always a collaborative one, and chances are that the people you deal with do not have AutoCAD but some other CAD application that is not able to read AutoCAD’s native DWG format.

To help bridge that gap, professional drafters and designers have, for the most part, resorted to a secondary, more reliable alternative:  the PDF format. You and your clients or colleagues may both be transmitting CAD drawings via PDF to collaborate back and forth on them.

AutoCAD PDF in Able2Extract

Whether these CAD drawings are complex floor plans newly converted to PDF or older archived product designs, the format ensures that both of you can see those CAD drawings as intended, uncompromised.

Yet further on in the workflow, these CAD designs will need modifications, corrections or adjustments before any design plan is finalized.  However, the PDF is a locked down format that makes those vector graphics and text uneditable. You would have to convert the PDF file to a format in order to make any improvements or edits on it.

Able2Extract: PDF to AutoCAD Converter

Our Able2Extract PDF converter is a tool which can accomplish that. As a PDF utility, it is a swiss army knife of PDF converters. It can convert PDF data into more than 10 different formats—AutoCAD included. With it, you can recover vector graphics and text that are locked in PDF.

Though dealing with CAD files may be complex, the conversion method is simplified down to 4 steps:

1. Open the PDF in Able2Extract

Open File Command

2. Select the graphics and text you need to convert with the All or Area selection commands

Selecting content

3. Click on the AutoCAD icon on the command toolbar.

Converting PDF to AutoCAD

Able2Extract will then let you customize your output.  When you select the PDF to AutoCAD conversion command, you are presented with these CAD specific settings:

Able2Extract AutoCAD Conversion Options

You can select DWG (or DXF, if needed) as your conversion output, adjust the color palette, unit measurements, polyline width, and insertion point.  You will also be able to keep those same conversion settings as a default if needed.

4. Click on Convert and save your file to your computer.

Once the conversion is done, you can make any required edits to the recovered vector graphics and text in AutoCAD, continuing on with the review and drafting process.  As an intermediary software program, Able2Extract extracts your CAD content into layers you can easily work with.

Able2Extract PDF Converter is compatible with Windows, Mac and Linux (Ubuntu and Fedora) platforms. You can test Able2Extract’s PDF to AutoCAD conversion feature with the 7-day free trial. A full version license can be purchased from our website, as well,  for $99.95 or you can opt for the more flexible 30-day subscription for $34.95.

3 Tips On How To Use Excel For Calculating Taxes From PDF Data

Calculating-Taxes-Excel Photo Credit: gonzalo_ar via photopin cc

Tax season rolls around every year and with it comes the head ache of getting organized. It means digging up year old statements and revisiting your ledgers, which is a daunting task in itself. Even worse, if you’re a procrastinator, it may mean the added stress of finding walk-in tax centres booked solid, forcing you to take the DIY approach.

Admittedly, doing taxes yourself can be risky. But user-friendly tax software and speedy e-filing methods are incentive enough to make the attempt. Getting the numbers right is what matters most.  For that, there’s Microsoft Excel, one of the handiest tools for calculating and dealing with complex data.

If it’s your first time doing your taxes online, we’ve got a few important pointers that can make working with taxes and Excel easier for you.

1. Insert, Adjust And Calculate Your Tax Data In Spreadsheets 

Tax CalculatorPhoto Credit: Jorge Franganillo via photopin cc

First off, to calculate your income taxes, you first need to calculate your taxable income. To do this, convert your financial data into Excel so you can work in your applicable deductions, credits, and exclusions using Excel formulas and functions. They can seem scary and complicated, but once you get the hang of them, they are invaluable!

Second, because all invoices and tax deductible receipts are different, you want to ensure that your converted data is properly adjusted and laid out.  If you’re calculating your federal income tax using tables in Excel, your results depend on where the data is placed. Thus, correctly inserting disparate data from the start will help prevent major calculation errors.

Able2Extract Excel Preview Panel 
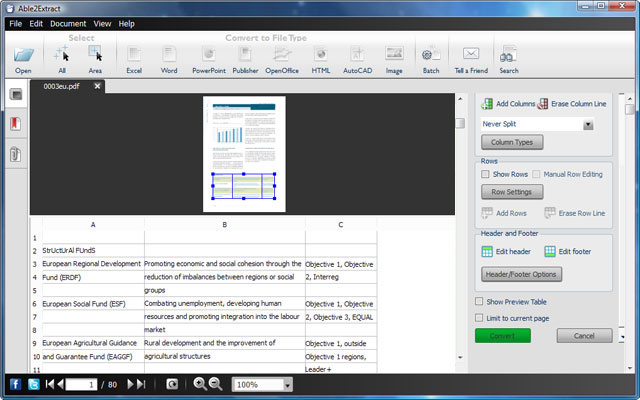
A custom PDF to Excel conversion though can fix the alignment of cells and their data just where you need them. Able2Extract lets you manually move the row and column lines and even give you a preview of how the data will look in your spreadsheet.

2. Use Separate Worksheets For Data Calculations

Every tax filing is different and depending on your situation you may need to use supplemental tax forms and schedules. You may also need other tools, like updated tax tables or the tax computation worksheet from the 1040 US tax return instructions.  So consolidating your data where needed can be an efficient way to stay organized.

Excel Worksheet Names

Every tax form, calculation, or schedule requires special attention. Consequently, you may want to use separate worksheets for different schedules or forms. This way you can set each one up with defined formulas for calculating specific data.

This has a lot of convenient benefits. Each year, you can go back to the same worksheet and just drop your updated numbers in. If you need numbers from different PDF statements, you can convert the relevant data into the same worksheet using Able2Extract.

Able2Extract Custom Excel Template
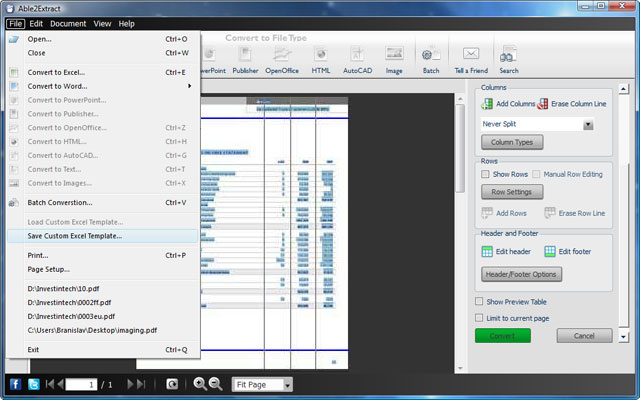
Moreover, its custom Excel template feature, you can set up your Excel conversion once, save it as a template (seen above), and use it on next year’s PDF statements, which, more than likely, will be formatted with the same layout.

3. Keep Data Formatting Consistent 

Consistent Data FormattingPhoto Credit: Jorge Franganillo via photopin cc

If you use different Excel formatting due to language and cultural preferences (commas for decimals or pound signs instead of dollar signs, for instance), you should make sure that all notations are consistent to avoid misinterpretation. Fortunately, Microsoft Excel is highly specialized in formatting and manipulating data.

To fix the formatting in Excel, you can use the Sort & Filter and Data Tools section in the Data tab or the Numbers and Editing sections in the Home tab.  To do this even more efficiently, reformat your PDF data even before it even reaches the spreadsheet. With PDF receipts and records, you can change the notation and formatting during the PDF to Excel conversion.  

Able2Extract Excel Conversion Parameters

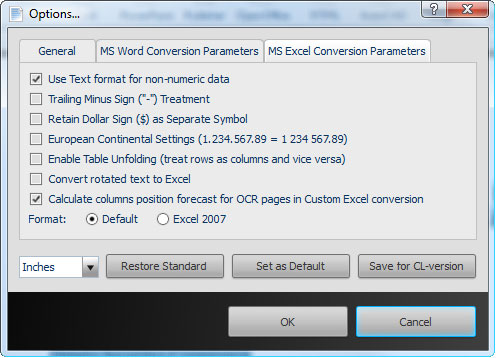
Using the MS Excel conversion parameters in Able2Extract will adjust your data to fit the format you want to use in your spreadsheet, like whether or not to replicate the fonts from the PDF. Retain the dollar sign as a separate symbol, use European continental settings, or treat rows as columns and vice versa.
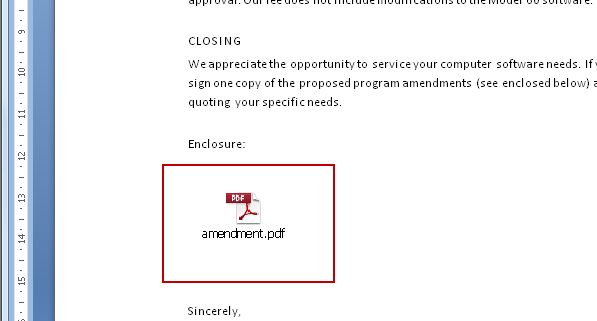
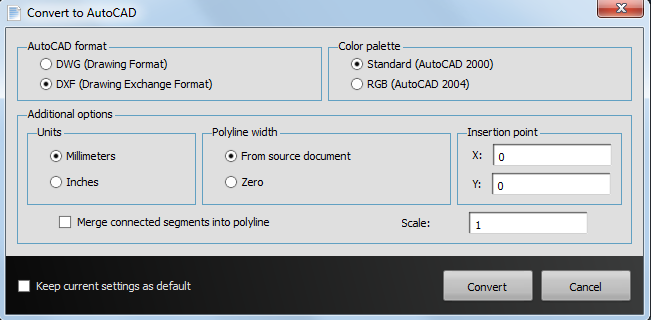
How To Create A Printable Valentine’s Day PDF Coupon Booklet With Sonic

It’s always tough coming up with the perfect gift for our loved ones, especially around Valentine’s Day when generic chocolate boxes and teddy bears take the spotlight. Have you found that ideal gift yet?

If not and you’re thinking of gifting something creative and genuine this year, a Valentine’s Day coupon booklet might just be the thing you’re looking for.

The idea behind this concept is to customize each coupon with actions  and treats that others can “cash in” on. The more you know the person, the more meaningful your coupon gift can be.  So if your significant other hates a certain chore, you can create a coupon offering to do it for them. It’s a great (free) way to give a personal gift that keeps on giving!

Valentine printable gift

Getting them into a PDF booklet is just a handy way of getting them in a format you can save and instantly print up and give out.  But you may find it difficult to get the formatting just right for a printable book.   An easy way to do this is by using the Create Booklet feature in Sonic.

It can create and format a booklet from regular PDF files intended for professional print and assembly, like brochures and pamphlets.  And we can certainly use the feature for basic DIY booklet projects like this one.

Creating A Simple Printable PDF Booklet

You’ll first need to generate your coupons, which calls for  a bit of careful thinking.  To help here are a few ideas to get you going:

  • Offer coupons for your kids to stay up for one hour or to get some extra dessert
  • Spouses who are always fixing things around the house  can offer to handle the next household disaster
  • Boyfriends can include coupons to sit in on a chick flick with their girlfriends
  • For friends, how about a coupon to buy the next round of drinks?

After you have your  ideas, you can create your own coupons from scratch in Microsoft Office Word with text boxes and a bit of formatting.  We used a Word template because of its simplicity.  We customized the text, added some fine print, and saved it to our computer.

Valentine Coupon Template

Our template only offered 2 coupons per page, so we used 8 of them, customized each, and batch converted them. We then merged all the PDFs to get a single 8 page PDF with 16 coupons for this tutorial.

When you have your own file ready to go:

1) In Sonic, use the Create PDF From File command to browse, select and convert your MS Word to PDF.

2) Click on the Create Booklet option

Create PDF Booklet Sonic

3) Select your options.

i) For a basic booklet, select Landscape mode and LETTER sized paper.

Sonic Create Booklet options

ii) Under Scale, select Auto. Ensure Proportionally is selected.

iii) Leave the Margins default settings to leave room for any personalizations you’ll want to add in after it’s printed.

iv) For Binding Type, select Book. Set the Sheets per Fold setting at 4.  This works for an 8 page PDF with 2 coupons per page. It combines 2 pages onto one, allowing you to bind the pages at the centre. When folded, you get single-sided coupons which are perfect for cutting out.

Valentine Sonic booklet layout

v) Crop Marks and Bleed Allowance can be left to their default values.

4) Add any other elements that are appropriate:

  • Add a secure PDF password to keep the PDF coupons secure and prevent any other print outs.
  • If there’s no set expiration date, add a watermark down the length of each page first to keep track of them.
  • Go back and add a cover page to the booklet. Insert a blank page you can stamp an image on or add a page from another PDF.

5) Save the PDF booklet to your computer, print it out, and bind the pages.

Here’s what ours looked like, fresh off the printer with the above settings and an added cover page. As you can see, you’ll have a lot of freedom to jazz it up in your own style:

Printed Valentine PDF Booklet

If you haven’t used the feature yet, now is a good time to get acquainted with it. So go ahead and start in on your own booklet.  No doubt, you’ll have a lot of original and thoughtful coupons to generate.

Main Photo Credit: Patricia Mellin via photopin cc

How To Convert Your Facebook Data To PDF With Sonic PDF Creator 3.0

Facebook is the number one site where you probably spend most of your time online. Undoubtedly, the comments, messages, photos, and videos you post up end up accumulating into one big online scrapbook of your best and most memorable moments in life.  It isn’t any wonder then that you would want to preserve that content offline and onto your computer?

While the videos and photos you have posted up might already be on your computer, there are some related bits, like the notes, comments, Wall posts or Facebook messages, which aren’t.

In fact, one of our PDF Creator Facebook app users was wondering if there was a way in which she could download and get all of her Facebook messages into PDF format.

If you want to download your Facebook data into a PDF file, here’s a detailed and slightly altered step-by-step version of the solution we put together and which you can try out for yourself.

1. Log into your Facebook Account

2. Go to Account Settings

3. Under General settings, click on the “Download a copy” of your Facebook data link below your personal information settings.

Download Facebook Data

You’ll then get an overview of what information will be archived and which won’t. 

4.  Click on the Start My Archive button and confirm your download. This process may take a while depending on how much data you have. Facebook will send you a link to download your archive file via email.

 Facebook Data Notification

As Facebook notes, all the data contained on your Facebook profile will be downloaded into one single archive.  However, you will get the chance to choose which folder and data you can convert later on.

5. Check your email for the link and click on it to reconfirm your password. Download and save the zipped file to your computer.

Facebook Data Confirm Download

6.  Extract all files from the zipped folder into a folder or location you can easily access.  It contains the individual files of your data– photos, videos, and web-based content.

To access your messages, go to HTML> Messages file.

HTML file

Double click to open the Messages file in your browser to make sure all the content you want is there.

Facebook Data Massages HTML File

To convert this data into the PDF format, you can use Sonic PDF Creator 3.0 to convert  HTML to PDF.

7. Once installed or if you have the program already, open Sonic PDF Creator and click on the Create PDF From File icon on the command toolbar.

8. Click on the Browse button.  Select and upload your Messages HTML file.

9. Click the Create PDF button. This should start the conversion process.

Create PDF From File

Once your Facebook data conversion is done, you can then add whatever PDF features you want to the file. Add a password, headers, footers, watermarks or bookmarks. When you’ve added all you want, simply save your PDF file in a location of your choice.

This process can work for any of the HTML data files you have in your archive. It’s an easy way to keep or reuse your Facebook content in a secure manner while customizing the file to your needs. Give it a try.

If you have another way of saving and preserving your Facebook data, let us know in the comments below!