How to Calculate CAD Scale Factor?

Industrial Technical Drawing

Part 7 of 13 in our How To Use AutoCAD series

When working in AutoCAD, you’re not only working with objects and drawings, you’re also working with dimensions and measurements. The latter two elements are what can make or break your drawing. If you can’t resize basic values when you need to, your drawings can’t be as accurate as needed.

Calculating a scale factor in CAD is, thus, a simple, but important task. When the drawings are printed for production, they’re represented much smaller than they actually are. Hence, we need to understand and implement the scale factors in order to adequately size dimensions, text, blocks and lines.

In short, the scale factor is the relationship between our printed units and our drawing units.  The simplest way to calculate the scale factor is by using these simple formulas.

For calculating scale factor out of architectural drawing scale:

  1. Choose your scale. For example:  1/4” = 1”
  2. Invert the fraction and multiply by 12 to get:  4/1 x 12 = 48
  3. Your scale factor is 48

For calculating the scale factor from an engineering drawing scale, only multiply the feet by 12. For an in-depth look at both engineering and architectural scales, check out this tutorial on CAD Scale Factors by ArchToolbox.

How To Align And Scale Objects Simultaneously?

Part 6 of 13 in our How To Use AutoCAD series

As you know, AutoCAD is all about creating accurate drawings. So being able to adjust and fine tune the placement and size of your objects accordingly is a necessary skill to have.  Whether you need to  resize your objects or move them around, you need to be able to manipulate your drawings accurately and with efficiency. That’s why it’s important to master the Align tool early on.

Here’s how to align and scale objects at the same time:

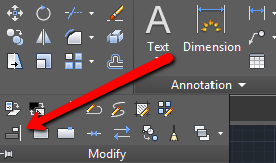
1. Identify which objects you would like to align. Go to the Modify panel, click on the drop down arrow and select the “Align” tool, located on the bottom left side.

Locating AutoCAD Align Tool

2. Select the object that you wish to align and hit “Enter”.

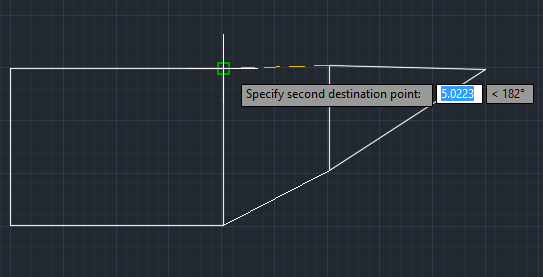
3. Select the source point. The source point is a part of the object that you align (for example, its edge, side or center). After doing so, specify the destination point of the alignment. The destination point represents a point to which you align your selected object. Hit “Enter” and specify the second source and destination point.

Specifying Second Destination Point

4. Either right click on the drawing window or press “Enter”. You’ll be prompted on whether you want to “Scale objects based on alignment points?” or not. If you’d like AutoCAD to automatically scale the selected object to fit your destination object, click Yes. Otherwise, click No.

Once you get the hang of it, this method will come as second nature. Mastering this tool is great skill to have under your belt. Not only does it allow you to quickly edit CAD designs accordingly, but it’ll also give you a better sense of how AutoCAD professionals work with the application.

How To Create Custom Hatch Patterns?

Part 5 of 13 in our How To Use AutoCAD series

One of the great things about AutoCAD is that it can be used to design drawings meant for different types of industries. And because AutoCAD designs can be intended for any structure under the sun, the material being used or involved in the design’s construction can vary greatly.  

This poses an interesting situation when AutoCAD users need to fill in the hatches of their drawings. These hatches represent the real material to be used. So getting the hatch patterns just as accurate as the drawings themselves is important.

Now, although AutoCAD offers plenty of hatch patterns on its own, sometimes we may want to personalize our drawings and implement our own hatch patterns. You can do this by following these simple steps:

1.In your AutoCAD document, draw a desired pattern using a tool from the Draw panel.

2. In the Block panel, click on the “Create” command, located in the top right corner.

Selecting Create Block Option

3. Name your pattern and click “OK”. On the pop-up, choose “Select objects”.

4. Click on your drawing until it gets light blue, and hit Enter.

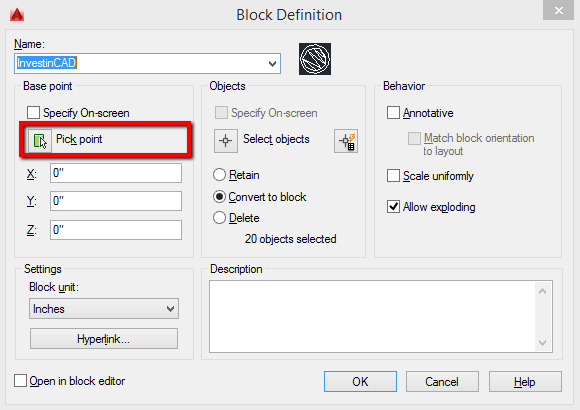
5. Now select “Pick point” and place the cursor on the bottom left corner of your pattern drawing.

Selecting Pick Point Option

6. Hit “OK”.

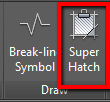
7. Go to the “Express Tools” tab > Draw panel > Super Hatch.

Selecting Super Hatch

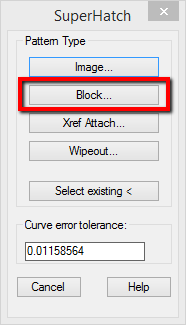
8. Choose “Block” as your desired pattern type, select your block by name and hit “OK”.

Selecting Hatch Pattern

9. Fit your pattern by following instructions. When you’re satisfied hit Enter.

10. Click on the desired area that you want to hatch and once selected, hit Enter.

All done! For advanced users who are interested in more hatch pattern customization options, check out this tutorial from Ellen Finkelstein.

How To Hatch Or Fill Objects/Areas?

Part 4 of 13 in our How To Use AutoCAD series

When using AutoCAD to draft blueprints or designs, the CAD designer must keep in mind the type of material that will be used when the design is built.  For this, AutoCAD uses “hatches” that represent solid masses and materials to be used and incorporated within the design when it’s built.

When creating your CAD drawing, you can decide on the pattern to be used to represent the material intended to be used during construction with AutoCAD’s hatch command.   

The hatch command in AutoCAD is used to fill an area or selected objects with a hatch pattern or a fill. Here’s how to use the command in a few simple steps:

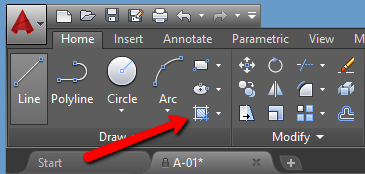
1.Go to the Draw panel on the Home tab. Find the hatch icon in the bottom right corner.

Using Autocad Hatch Command

2. You will see a “Hatch creation” tab. Go to its Properties panel and choose the Hatch type that you would like to insert. Choose between Solid, Gradient, Pattern or User Defined.

3. Further specify the pattern on the Pattern panel.

Pattern Hatch Type

4. Choose your desired method: “Pick Points” or “Select Boundary Objects”. The “Pick Points” will determine a boundary around the specified point. The “Select Boundary Objects” will allow you to manually select the boundaries of the area that you would like to hatch.

5. After filling the area, hit “Enter” to apply the hatch.

As you can see, when using AutoCAD for any design, being as detailed as possible is not only essential, but easy when it comes to specifying small details such as construction material.

How To Learn AutoCAD

AutoCAD Technical Design

In this day and age, anyone can pick up a new skill and turn it into a high-paying career asset. This is especially true for the tech savvy who already tinker around with and explore software on their own. They can translate that hobby into valuable skills needed for certain positions or tasks.

For instance, being able to create high quality AutoCAD images, 3D digital drawings and the like, is an extremely valuable skillset. Because of its extremely niched usage, AutoCAD isn’t a software skill likely to be common among average computer users.

And even if you’re not learning it for professional reasons, you may simply be curious about AutoCAD software, wanting to learn more about it.  

But where do you start? With such a complex piece of software, the learning process is sure to be confusing. Fear not.  Below are some basic answers, handy tips and a few pointers on how to learn your way around AutoCAD.

How To Learn AutoCAD On Your Own?

The best way to start learning AutoCAD on your own is to find an online course or tutorials that best suit your learning preferences and needs. For example, if you’re dominantly a visual learner you may want to start with YouTube video tutorials or enroll an online course with lots of video materials. If you prefer to learn by reading step by step instructions followed by images and screenshots, you may want to start with a basic course offering such materials. Fortunately, there are many AutoCAD learning resources to be found on the Internet. The first resource that comes to mind:  Autodesk official training guide, tools and learning tools.

Additionally, we’ve compiled a list of websites that provide free online AutoCAD courses, tutorials and complementary exercises.

Beside that, here are some additional helpful tips for self-learning with AutoCAD:

  • Find blogs and tutorials specific to your field of work. For example, if you want to learn how to use AutoCAD for mechanical workflows, try to find a blog or tutorial that specifically covers this topic.  
  • Search for exercises that will help you to memorize various commands by practice. He goes on to point out that this way of learning boosts your morale and self-esteem:  each time you complete an exercise, you feel more and more accomplished.
  • Start by learning how to use 2D drawing tools and applying what you learn to 2D drawings. If you don’t have any 2D drawings, just search the web; there are many 2D drawings available online. Once you get the hang of 2D drawing tools, then go for 3D which are mostly the same ones as 2D except for some specialized tools.
  • Practice, practice and then practice some more. This is the rule that applies to learning new skills or mastering a software application such as AutoCAD.

How Can Kids Learn AutoCAD?

Although AutoCAD isn’t a general purpose software application that all children will necessarily use in their higher education or future line of work, they can certainly learn how to draft 2D and 3D models in AutoCAD. Most importantly, a Quora thread shows that there’s an interest in teaching kids how to use AutoCAD.

A good place to start would be to teach a class or a child how to use one of the widely available free and easy-to-learn online apps for creating and printing 3D models. It’s fun and  good preparation for working with a more advanced desktop software program for 2D and 3D drafting such as AutoCAD.

The next step would be to do a few demos on how to use the key commands and solve common problems. Provide them with video lessons that you can create yourself or choose and use free online AutoCAD tutorials.  

There are also ready-made exercises and quizzes to test students’ progress. Follow their progress with the program and assign different challenges based on their individual performance, interest and engagement.

If you’re teaching, let’s say a bunch of 8th graders, chances are that majority of them won’t be engaged enough to become proficient in AutoCAD, especially if they don’t aspire to become architects or engineers. Therefore, adapt the course to accommodate for this and yet keep encouraging and challenging the students who do have higher engagement and interest levels.

How To Become An AutoCAD Professional?

Once you’ve mastered the basics and learned how to create basic drawings and blueprints in AutoCAD using any or all of the above mentioned techniques,  you’re ready to take your AutoCAD skills and expertise to the next level. Experienced AutoCAD users like Raymond Owusu suggest finding professional, complex drawings and trying to replicate them. Another good tip is to join AutoCAD forums and communities and ask how to do some difficult things. Consistent practice and especially real life projects will help you become a power user or even an AutoCAD professional.

The easiest way to test and prove your expertise in AutoCAD is to take a test provided by Autodesk and earn official certification status that will validate your drafting and design skills. Autodesk certifications are widely recognized credentials in the CAD industry and can establish you as an AutoCAD professional and further your design career.  

How To Get Autodesk Certification For AutoCAD?

In order to become Autodesk AutoCAD certified user or professional, it is necessary to take and pass a suitable exam offered by Autodesk.

You can find the detailed exam preparation information on the Autodesk website. This includes exam topics and objectives, recommended preparation methods for different certification levels, requirements, training options, and other related info.