


Part 4 of 13 in our How To Use AutoCAD series
When using AutoCAD to draft blueprints or designs, the CAD designer must keep in mind the type of material that will be used when the design is built. For this, AutoCAD uses “hatches” that represent solid masses and materials to be used and incorporated within the design when it’s built.
When creating your CAD drawing, you can decide on the pattern to be used to represent the material intended to be used during construction with AutoCAD’s hatch command.
The hatch command in AutoCAD is used to fill an area or selected objects with a hatch pattern or a fill. Here’s how to use the command in a few simple steps:
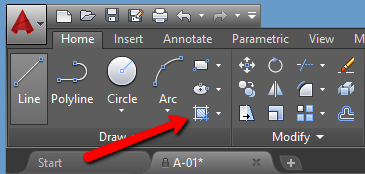
1.Go to the Draw panel on the Home tab. Find the hatch icon in the bottom right corner.
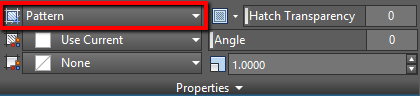
2. You will see a “Hatch creation” tab. Go to its Properties panel and choose the Hatch type that you would like to insert. Choose between Solid, Gradient, Pattern or User Defined.
3. Further specify the pattern on the Pattern panel.
4. Choose your desired method: “Pick Points” or “Select Boundary Objects”. The “Pick Points” will determine a boundary around the specified point. The “Select Boundary Objects” will allow you to manually select the boundaries of the area that you would like to hatch.
5. After filling the area, hit “Enter” to apply the hatch.
As you can see, when using AutoCAD for any design, being as detailed as possible is not only essential, but easy when it comes to specifying small details such as construction material.