Year-end offer: Save 50% on Able2Extract Professional single license purchases before December 31!

4 Great Ways To Make PDF eBook Navigation Easy

PDF eBook Reading

In this day and age of DIY e-publishing, the PDF is an invaluable format. If you’ve ever downloaded an eBook resource from a website or blog before, then you know how convenient it is to have all the information and content you need in one single PDF.  Yet sifting through all that content in lengthy PDFs can be a nuisance. 

PDF navigation may seem like a small issue, but believe it or not, there are PDF files that don’t come as well-structured as they should be.  Make it as easy as possible for your readers to navigate through your PDF eBook.

Here are a few quick tips to start you off.

1. Add Bookmarks 

Bookmarks are perfect for breaking up your PDF into manageable chunks. Your readers can get a visual overview before they even start scrolling through the PDF.  Most PDF creator applications will let you manually create bookmarks. In other cases, your PDF bookmarks will automatically be created if the formatting of your source document (such as MS Word) uses paragraph default styles, like “Heading 1,” to format your content.

PDF bookmarks for eBooks

For eBooks covering big topics that are broken down into smaller sections, create nested bookmarks. Nested bookmarks create a hierarchical parent/child list that can be easily expanded or collapsed, pointing your readers to even more specific locations in your eBook. Just remember to generate bookmark titles that are simple, consistent and descriptive.

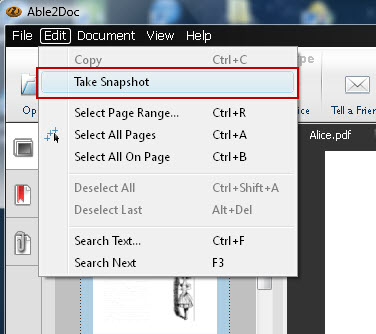
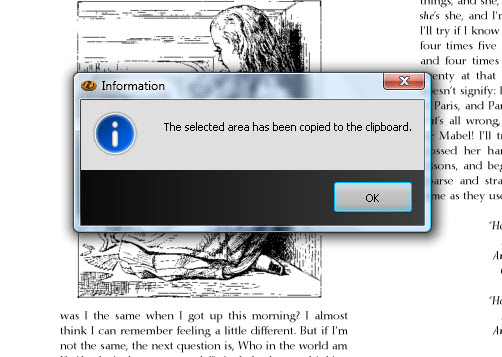
2. Add Internal Links

Where possible and appropriate, insert links into your PDF eBook.  If done properly, a page link can be an extremely effective way of directing your readers to relevant sections. This is especially handy in eBooks that are dense with information. You can direct your readers to the necessary sections.

Whether it’s to a glossary, an illustration, or to related sections, a link in the right place can go a long way.  You can even use links within your Table of Contents and make it a one-click process to get to a section. Internal links are a great way to boost the organization and reading flow of your content.

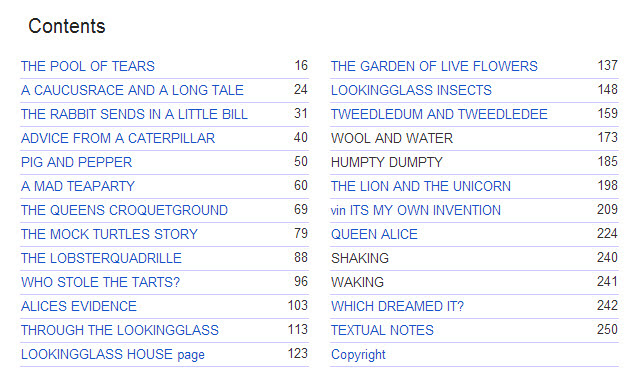
3. Include A Table Of Contents

Depending on the amount and type of content in your eBook, a bookmark list might enough to guide readers along. But when in doubt, it’s always good publishing practice to include a Table of Contents where you’ll have more than 10 pages.

PDF Table of Contents Keep in mind that PDF files can be either viewed on screen or read in printed form. In cases where users wish to print up a 100 page eBook, they’ll need a Table of Contents page for off-screen reading.  Just don’t forget to include page numbers in the footers/headers of your PDF eBook!

4. Integrate Interactive Navigation

In addition to the default navigation controls of PDF readers, you can insert navigational controls such as page buttons directly into the PDF content itself.  Sounds hard, but with the right software you can create a navigable PDF button from linking a specified trigger area (button) with a target action to a page.

This is a perfect fit for eBooks containing multimedia and other dynamic content. However, just remember that what icons or controls may be intuitive to you, might not be to other users. Thus, if your navigational controls go beyond flipping from one page to the next, include a discreet legend.

In short, the easier it is to get through your PDF eBook, the better! What do you do to make your PDF eBooks easy to navigate?  If we missed a tip or two, share it in the comments!

Able2Doc 7.0 Tip: Taking A Snapshot From PDF Documents

Despite the pressing need to work with PDF content, PDF conversion, despite all its benefits, might not always be what you need.  Think of those times when you need just a snippet of PDF content in a document, like when you conduct research with PDF files, for instance.

Copying and pasting on your computer is probably the first thing that comes to mind.  It’s a common, yet often messy, way of getting text or images into MS Word documents quickly. However, the results you have to edit afterwards are one major reason why PDF conversion is usually the better option.

But knowing that our users may still want the option of doing so, our desktop converters include a Snapshot feature. It gives you a way to create a proper snapshot of selected PDF content. For a more detailed look, here’s a walk through on the feature and how you can take a snapshot with Able2Doc 7.0.

1. Open your PDF file in Able2Doc 7.0

2.  Go to Edit> Take Snapshot.  This will activate the feature and let you select a portion of the active PDF to be saved to the Clipboard as an image

Take Snapshot feature in Able2Doc

3. Using your mouse, select the image or content that you would like to save as an image, as you would normally select an area for converting PDF content

Selecting PDF content for Snapshot

4. Once the selection has been made, you’ll get a popup letting you know that the content has been saved to the clipboard

Copying PDF content to clipboard

5. Go to the file or document where you need to insert the content. Then simply paste the content from your clipboard using CTRL + V or by selecting Paste from the right click context menu.

 Pasting PDF content in Word

This tip is also applicable to Able2Extract PDF Converter. For scanned PDF documents, the only selection method available is area-based selection (this option enables data to be selected on a column-by-column or section-by-section basis rather than line by line).

So if you ever find yourself needing a quick image of your PDF content, the snapshot feature can get the job done easily.

How To Export Open Office Files To Google Docs

Working via the cloud is unavoidable these days. Thanks to mobile devices, we’re finding more efficient ways of working while away from the office.  In fact, a common productivity habit these days is to send the document you’re working on to Google Docs so you can edit them from anywhere.

Well, if you’re using Open Office to create those documents, we’ve got a great productivity tip for you. In addition to helping you convert PDF to Open Office, we came across an Open Office extension that will let you instantly export your Open Office files to Google Docs: OpenOffice.org2GoogleDocs (OOo2GD).

OpenOffice.org2Google Docs is an extremely handy plug in that allows you to export, import and update your Writer, Calc, and Impress files to and from Google Docs.

The best part about this extension is that it simplifies the entire process and lets you do it right from within the Open Office suite itself. Take a look.

Installing OpenOffice.org2GoogleDocs

To start exporting your files, you’ll obviously need to install the plug in first.  To do so, follow these steps:

1. Download the OOo2GD extension by clicking on the Get it Now button. Save the extension to a location you will remember.

2. In Open Office Writer, go to Tools>Extension Manager…

Accessing OpenOffice Extension Manager

3. In the Extension dialog, click on Add. Then browse, locate and select the OOo2GD extension you saved in step 1.

Adding OpenOffice Extensions

Once installed you should see it enabled in the extension list:

OOo2GD Toolbar AddOn

4. Restart Open Office. You’ll find the OOo2GD Add-On ready for you to add to your regular toolbar for quick one-click access to the functionality. Place it on your toolbar by clicking and dragging it to an empty spot on your toolbar.

OOo2GD Toolbar AddOn

Note: This is toolbar is optional. You can also access the functionality via File > Google Docs & Zoho.

How To Export Your Open Office Files to Google Docs

Now that you have the extension installed, you’re ready to start exporting your files to Google Docs. We put a quick step-by-step tutorial to help guide you through the process. To export your Open Office document,

1. Open the file you wish to export and click on the Export to Google Docs button:

Exporting OpenOffice to GoogleDocs

2. In the pop up dialog, enter your Google Docs Account credentials

Entering GoogleDocs Credentials

3. Select Convert to Google Docs format and Autoupdate. This will allow you to automatically set your file up for syncing and editing within Google Docs.

4. Click on OK.  OOo2GD will then start uploading your file to your Google Drive.

5. Sign into your Google Drive account and locate the file

OpenOffice file in GoogleDrive

6. Click to open the file and you can then edit the document as needed within Google Docs

Editing OpenOffice in GoogleDocs

You can also quickly import Google Docs into Open Office in a similar manner. After clicking on Import to Google Docs, just input your credentials, click on Get list and you can select which file you want imported. Click on Open. 

Importing GoogleDocs to OpenOffice

This extension is perfect and convenient for worker bees who need to take their work home with them. It eliminates the hassle of a USB key and toggling back and forth between saved copies.  Do you have a favourite OpenOffice extension yourself? Which one helps you out the most?

5 Great Ideas For Creating A Personalized Mother’s Day Message

No matter how you decide to celebrate Mother’s Day this year, there will always be one thing you’ll give your mother without fail: your Happy Mother’s Day greeting message.

Yet, however you send it to your mother online, whether it’s in an email, an e-card, or posting up a simple “Happy Mother’s Day” message on her Facebook page, it just doesn’t seem enough. Ever think that it could use a personal touch? That it could be made even more special?

Why not take your Mother’s Day message to the next level this year? Make sure it’s a special day with a message specially crafted for her. Here are a few ideas to jazz up your Happy Mother’s Day greeting with a few tips and tools.

1. Digital Photo Albums

Mother's Day Photo Album

Sometimes the best gift you can give is a collection of good moments, and a Mother’s Day Album is a great way of getting them into one single package. When creating it, try getting a good collection of photos over the year since last year’s Mother’s Day. Each year is unique and with it you’ll want to capture the best moments and memories of each one.

Tools: jAlbum, Photobucket, Flickr

Tip:  Since albums are ultimately a collection of captured moments, an album collecting different facets of your mother as a person is a great way to show your appreciation for the person she is.  For this, create one that has multiple sections. Within each section, designate a category like “mother,” “best friend,” or even “super hero.”  Then include photos that show her in different moments, representing those traits throughout the year.

2. Photo Collages

Mother’s Day Photo Collage

We’ve all had those moments we wish we had kept in a bottle, and surely your mother has had them too.  Photo collages can be a perfect way to “bottle” those moments up.  The best part about collages is that you can be as artistically creative with them as you’d like. Add pictures not normally associated with each other or arrange them in different patterns. See where the collage takes you!

Tools: Fotor, PhotoCollage, Photovisi, Canva

Tip:  In your collage, mix in images that you associate with those moments, whether it’s a picture that sets a mood or one that evokes a special meaning to you both. It’s a visually challenging project, but an effective one that doesn’t need words to get your message across.

3. Word Clouds

Word Cloud for Mother’s Day
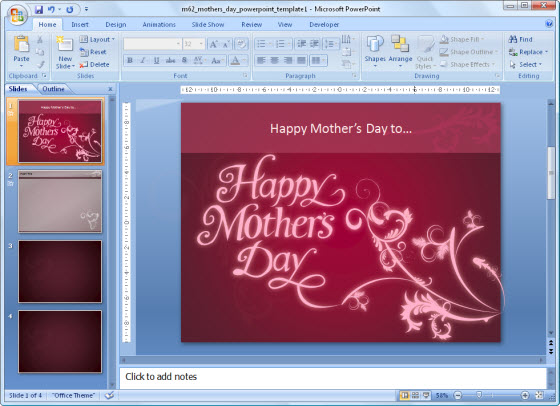
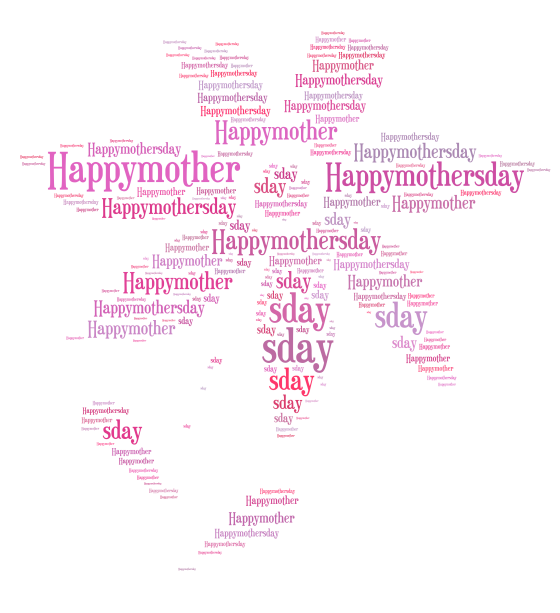
Just like a collage, word clouds can express your Mother’s Day message with a visual mash up of ideas. This is perfect as a family project as every member can contribute their own words as well.  Online word cloud generators are flexible enough to work with websites, documents, and text. In most cases, you can even tailor the shape of your word cloud.

Tools:   Wordle, WordItOut.com, Tagxedo

Tip:  Fit in words that pertain not just to your mother, but to your relationship as well. For instance, adding nicknames or places that are special to you both will add a nice touch to remembering the memorable tidbits in your lives.

4. Audio Recordings

Mother's Day Audio Recording

A simple post that states “Happy Mother’s Day” just isn’t enough. And let’s face it. A written message doesn’t have the same authenticity or weight than a real live voice. Hearing those words from the mouths of loved ones themselves is priceless. So why not make an audio recording of your Mother’s Day greeting? Add sound effects, special messages or even make a song out of your Mother’s Day greeting.

Tools:  Apowersoft, Vocaroo, Chirbit

Tip:  Ever hear of that TV show “This is Your Life”?  This is a perfect opportunity to replicate that same spotlight on your own mother in audio format. Record every family member’s anecdotes which involve your mother. Then put it all together. The result? Your mother gets to hear some great memories from the people who matter the most.

5. Multimedia Presentations

Mother's Day Presentation

Who says presentations are only for professional purposes?  Make a presentation listing all the great things about your mother.  This is a more flexible greeting format as you can decide how you want it to look, what you want it to contain and which sorts of media to add—images, audio, text, and even video.

Tools: Prezi, MS PowerPoint, GoogleDocs Slides, Moovly

Tips:  Don’t forget that you can also set up presentations as a slideshow. As such, try formatting the presentation as a narrative so it can simply play and take your mother through it.  She can watch her mother’s day gift like it’s movie night at home.

How To Install Able2Extract 8 On Ubuntu

Right now, open source is on the rise, and adding to the already growing list of Ubuntu supporters is China. Canonical, the company behind Ubuntu, has been collaborating with the Chinese government to develop a standardized operating system known as Ubuntu Kylin, which will be released later this week on Thursday.

Ubuntu already offers a Chinese Edition of the OS, but Ubuntu Kylin will be a new version significantly aimed at supporting how Chinese people work on computers. Among other things, it will integrate pre-installed localized tools, offering easy access to web services and software they commonly use right from the Dash.

This is great news for the open source community and Chinese users looking for alternatives they can start using effortlessly.  If this latest development has you wanting to find out more about Ubuntu before the big day arrives, this is certainly a perfect time to test it out.

Able2Extract 8 For Ubuntu Users

Well, for all you Able2Extract users wanting to switch over—or for those who need a PDF converter on Ubuntu, we have just the thing. We put together a quick tutorial on how to install Able2Extract 8 on the open source system.  With Able2Extract 8 you can convert PDF to Open Document Formats and more.

This tutorial was written using Ubuntu 12.10. For instructions on installing the latest version, visit Ubuntu’s Installation Help page.  Once you have it installed and all set up, follow these steps.

1. Go to the Investintech.com site and download the latest version of Able2Extract 8 for Ubuntu.

2. Click on Open with Ubuntu Software Center.

Download installation file

3. Access the installation file through your dashboard. Click on Install.

Installing Able2Extract

If you have a password for administrative purposes, enter it in and authenticate the installation to continue.

Authorizing Able2Extract Installation

4.  When the installation is complete, accept the terms of the End-User License Agreement to get started with Able2Extract 8 on your computer.

Accept Able2Extract EULA

And that’s all there is to it!

Converting PDF on Ubuntu

Will you make the switch to Ubuntu or try Ubuntu Kylin?  Jump in on our Google Plus discussion on this topic and let us know your take on the latest development.