Year-end offer: Save 50% on Able2Extract Professional single license purchases before December 31!

How To Go From Full Time MBA Student To Productive Business Pro In Less Than 5 Tips

Empty Meeting Room

You’ve graduated. You’ve secured a job. Now what? As the reality sinks in, you’ll realize that getting that coveted position was only half the battle.  Making the leap from a full time student to a full time professional is the other, much tougher, half.

By far, the biggest challenge is finding the right balance as you adjust to your new position.  It calls for a shift in your daily habits, your lifestyle, and your productivity. And effective tech habits are part of that. They’re crucial to how we work. If they can’t be efficiently put to use, neither will your time.

Obviously, we all have our own ways of working with tech. Yet what habits you had in business school might not work in your new position.  Fortunately, it’s possible to make a smooth transition with a few productivity tech tips that will keep you on track and well-adjusted.

1. Optimize Your Computer Workflow

To start, make sure your computer is set up to complement the way you need to work. Put your everyday files within one or two clicks by optimizing your desktop station with Dropbox. A simple cloud service like Dropbox can keep you constantly connected and highly organized.

If you’ve used this as an MBA student then you know how well it can back up your documents across mobile and desktop platforms. And as a business pro, it can bump up your productivity by using it to create an effective file folder and labeling system.

File Folder Case

How:

Labeling your folders is key. When working with documents, we usually work with them as a part of an on-going process.

So name your folders according to stages in your work: Working Drafts, Documents To Review, Finalized Documents, and so on. Then create subfolders for different categories—Clients, Office documents, Monthly reports, and the like.

This system lets you instantly dig up and locate a file according to where it is in the workflow rather than having to sift through broad categories first.

2. Stay On Track With A Personal Task Manager

Make sure you set up a good daily routine that includes a task list.  Setting up goals safeguards your time and keep you from multitasking because the amount of time spent on different things doesn’t always equate to productivity.

An app like To-Doist is simple yet powerful enough to keep you on task. It has both a web and free app that are easy to use.

How:

To work effectively, sort your tasks by priority and length of completion time. Tasks of high priority with short deadlines go to the top of the list. Low priority tasks with longer deadlines go at the bottom.

For on-going jobs, break them down. Schedule them in for the next day at the end. This way you’re constantly working on them bit by bit until completed.

Also, reserve blocks of time for emails, phone calls, lunch, and frequent breaks to prevent you from getting side tracked and ensuring that you have a well balanced routine.

Scheduling your day is important during the first weeks when you’ll naturally be working slower than usual. Setting up your task list like this allows you to focus and give you time to accomplish one task at a time.

3. Boost Your Mobile Phone 

 For the first week, you will probably be shown around the company as part of your orientation. Remembering everything from procedures to document processing is key.

Simplify this by getting an app that can raise your mobile productivity.  For instance, an app like Evernote is a popular utility that will let you take notes right on the spot.

Uploading Files To Cloud

How:

Create a New Note for every reminder you need and categorize them into Notebooks for different aspects of your orientation: Procedures, Team Members & Roles, Clientele, and so on.

The best part is that you aren’t limited to typing your notes. You can record voice memos when you don’t have time to type and take snapshots of examples you may need for reference later on.

With the many services and apps you can use, Evernote becomes a powerful cheatsheet tool that can make the first few weeks a breeze.

4. Connect With Professionals Online

As the new kid on the block, you’ll want to be prepared for any project that comes your way. Whether this means turning to an image editing tool for custom graphics and media projects or YouTube videos for MS Office how-to’s, you should have the right resources at your fingertips.

For times when you need guidance and advice, you should join Quora, one of the top Q & A sites where you can connect with experts.

How:

If you follow top business influencers in your field, you can gain valuable insight based on real life experience.

The advantage of this site is that you can get in touch directly with professionals. First, you can visit their profiles and send them a simple message introducing yourself.

Or second and more effectively, you can use the network’s Ask to Answer feature. This allows you to have your question sent to a professional of your choice directly. So the more active you are the better a resource Quora can become!

You’ve worked hard to earn your position, so don’t let a few snags affect your performance. There are many ways to improve your technical game. Use what works for you. Give these tips a test run and let us know how you plan on making the transition easier.

How to Calculate CAD Scale Factor?

Industrial Technical Drawing

Part 7 of 13 in our How To Use AutoCAD series

When working in AutoCAD, you’re not only working with objects and drawings, you’re also working with dimensions and measurements. The latter two elements are what can make or break your drawing. If you can’t resize basic values when you need to, your drawings can’t be as accurate as needed.

Calculating a scale factor in CAD is, thus, a simple, but important task. When the drawings are printed for production, they’re represented much smaller than they actually are. Hence, we need to understand and implement the scale factors in order to adequately size dimensions, text, blocks and lines.

In short, the scale factor is the relationship between our printed units and our drawing units.  The simplest way to calculate the scale factor is by using these simple formulas.

For calculating scale factor out of architectural drawing scale:

  1. Choose your scale. For example:  1/4” = 1”
  2. Invert the fraction and multiply by 12 to get:  4/1 x 12 = 48
  3. Your scale factor is 48

For calculating the scale factor from an engineering drawing scale, only multiply the feet by 12. For an in-depth look at both engineering and architectural scales, check out this tutorial on CAD Scale Factors by ArchToolbox.

How To Align And Scale Objects Simultaneously?

Part 6 of 13 in our How To Use AutoCAD series

As you know, AutoCAD is all about creating accurate drawings. So being able to adjust and fine tune the placement and size of your objects accordingly is a necessary skill to have.  Whether you need to  resize your objects or move them around, you need to be able to manipulate your drawings accurately and with efficiency. That’s why it’s important to master the Align tool early on.

Here’s how to align and scale objects at the same time:

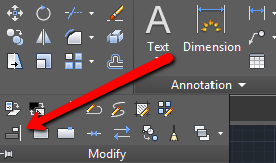
1. Identify which objects you would like to align. Go to the Modify panel, click on the drop down arrow and select the “Align” tool, located on the bottom left side.

Locating AutoCAD Align Tool

2. Select the object that you wish to align and hit “Enter”.

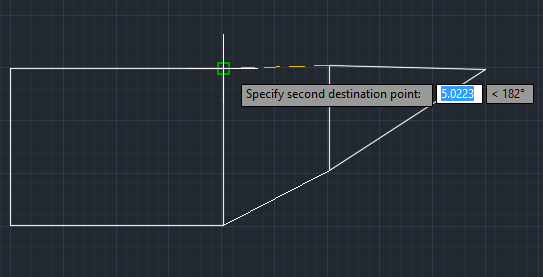
3. Select the source point. The source point is a part of the object that you align (for example, its edge, side or center). After doing so, specify the destination point of the alignment. The destination point represents a point to which you align your selected object. Hit “Enter” and specify the second source and destination point.

Specifying Second Destination Point

4. Either right click on the drawing window or press “Enter”. You’ll be prompted on whether you want to “Scale objects based on alignment points?” or not. If you’d like AutoCAD to automatically scale the selected object to fit your destination object, click Yes. Otherwise, click No.

Once you get the hang of it, this method will come as second nature. Mastering this tool is great skill to have under your belt. Not only does it allow you to quickly edit CAD designs accordingly, but it’ll also give you a better sense of how AutoCAD professionals work with the application.

How To Create Custom Hatch Patterns?

Part 5 of 13 in our How To Use AutoCAD series

One of the great things about AutoCAD is that it can be used to design drawings meant for different types of industries. And because AutoCAD designs can be intended for any structure under the sun, the material being used or involved in the design’s construction can vary greatly.  

This poses an interesting situation when AutoCAD users need to fill in the hatches of their drawings. These hatches represent the real material to be used. So getting the hatch patterns just as accurate as the drawings themselves is important.

Now, although AutoCAD offers plenty of hatch patterns on its own, sometimes we may want to personalize our drawings and implement our own hatch patterns. You can do this by following these simple steps:

1.In your AutoCAD document, draw a desired pattern using a tool from the Draw panel.

2. In the Block panel, click on the “Create” command, located in the top right corner.

Selecting Create Block Option

3. Name your pattern and click “OK”. On the pop-up, choose “Select objects”.

4. Click on your drawing until it gets light blue, and hit Enter.

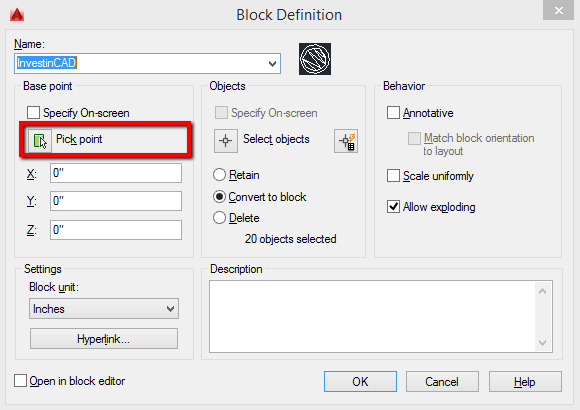
5. Now select “Pick point” and place the cursor on the bottom left corner of your pattern drawing.

Selecting Pick Point Option

6. Hit “OK”.

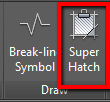
7. Go to the “Express Tools” tab > Draw panel > Super Hatch.

Selecting Super Hatch

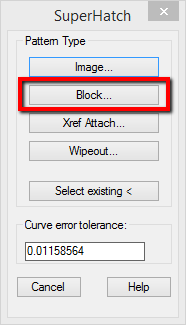
8. Choose “Block” as your desired pattern type, select your block by name and hit “OK”.

Selecting Hatch Pattern

9. Fit your pattern by following instructions. When you’re satisfied hit Enter.

10. Click on the desired area that you want to hatch and once selected, hit Enter.

All done! For advanced users who are interested in more hatch pattern customization options, check out this tutorial from Ellen Finkelstein.

4 Simple Ways Budding Project Managers Can Start Creating Gantt Charts

Organized Project Planning When remote teams are becoming more and more common, it isn’t surprising to see project managers struggling to stay on top of things. One project involving a number of tasks with just as many people working on it can spin out of control.  You’re not only working with people, but you’re also working against time and resources.

And this is where a Gantt chart steps in. If you aren’t using one as a budding project manager, you may want to. Gantt charts are an essential tool to project management. They keep a detailed track record of a project’s critical path at any given moment.

It keeps you up to speed on important factors like the progress or status of a task. Interdependent tasks and resources can be allocated, visualized, and coordinated. And with the internet and your everyday computer, Gantt charts can be updated as needed.

But technology needs and personal preferences are diverse. We know there are many other simpler, quick fix tools that can be used to manage projects to varying degrees. Looking to step things up? Need more complex features?

Whether you’re stepping into a project mid-stream or need to consolidate your project calendar with an existing one, there are ways you can integrate existing tracking sheet and schedule data into a Gantt chart.

1. Convert Google Calendar, Base Camp & Trello Into A Gantt Chart

Now Google Calendar, Base Camp or Trello are probably the most popular free tools online. They’re easy to set up, offer the basic project tracking essentials and can quickly get you started.

Google Calendar, as a project planning tool, needs no explanation.  Basecamp, known for its highly collaborative nature and tracking features, is a popular go to option for managing teams. And Trello is a web app that uses individual (and collaborative) task cards grouped into boards in lieu of a To-do list.

So if you need to suddenly create professional-looking tracking reports or share your calendar with others, great news is that you can create a Gantt chart from all 3 tools using Ganttify.

Gantt Chart Creation Webapp

Ganttify is a webtool that does what it sounds—it takes your data and “Ganttif-ies” it without having to do much but log into your accounts (note that with Trello, though, your task cards need to have a start and end date included).

2. Create Gantt Charts In Microsoft Excel

If you’re just starting out on managing your first project, chances are you’ll turn to familiar tools like Excel where you’ll construct your own tracking sheet with basic formatting and formulas. However, don’t be afraid to get a little more complex and use Excel to create a Gantt chart.

Officetimeline.com, for instance, offers up a detailed, step-by-step tutorial manual on how to create a Gantt chart Microsoft Excel users can set up. Note, that creating one from the beginning can be time consuming, but as your projects become more complex, you’ll be glad you invested the time.

For those who don’t want to create things from scratch, though, you can still get the job done by using a Gantt chart template.  You can find a variety of them online. Here are a few to start you off:

  • A simple 4 week project timeline Excel template from Office.com
  • A free version of Gantt Chart Template Pro from Excel expert, Jon Wittwer, at Vertex42.com
  • GanttExcel.com also has a template you can download that has both a paid and free version
  • Chandoo.org offers a variety of Gantt chart templates for project management

3. Import Excel Data Into Microsoft Project 

For a more specialized project management tool, Microsoft created MS Project. While part of the popular MS Office suite, the project management software program isn’t included with the desktop suite.

This program offers the high end features that are needed for more multi-level complex projects that need high level monitoring and workflow analysis, cost calculations, in-depth planning, enterprise-wide access and more.

However, if you started tracking your project with MS Excel and are switching over to MS Project, there’s good news. You can simply import Excel into Microsoft Project. When you create a new project, choose to create one from Excel. From there, the MS Project import wizard will guide you through the rest.

4. Create A Gantt Chart Online

Online project management is common nowadays. And with cloud storage and remote teams, being able to take and keep things online is essential.

It isn’t any wonder that you can create Gantt charts online free from the very beginning, making it easily accessible from wherever you or your team are. Though you get what you get with online versions, the essential features are there.

Ganttic.com is an online resource planning, scheduling and management tool. While paid accounts will provide you with more features, for project managers that are bootstrapping it, there’s a limited free account available. It allows you only 10 resources to track. but despite the limitation, Ganttic.com has features that are streamlined and simplified.

Ganttic Introduction from Ganttic on Vimeo

Second is Gantter.com which is a free cloud-based project management tool. This one sticks out because it works tightly with Google Apps and Google Drive, which, if you’re working with a Google based team, is perfect.

Its features leverage the power of Google’s cloud services, including real time editing, chat, and Google Drive access. You can even import and export files from Microsoft Project. Not a Google user, though? Don’t worry.  Gantter.com offers a smartapp.com edition that ties in other cloud drives you may be using.

How are you keeping track of your project and your team? If you know of any other Gantt Chart tips to expand on this list, let us know in the comments.