


If you’re a Canadian, then you know that the deadline for filing your 2017 tax return is looming. You have until Monday, April 30, 2018, to submit your return to the CRA and avoid paying penalties and interest. If you’re self-employed, the deadline isn’t so tight–you have until June 15 to file your return.
Now many of us find the task in question daunting and fight the anxiety in the worst possible way: by procrastinating. As the deadline approaches, the nation-wide scramble begins to get acquainted with the new tax rules for 2018, check the eligibility requirements for claiming credits and deductions, collect all necessary documents, make accurate calculations, fill in forms, etc.
Of course, there’s always the possibility of hiring an accountant to do your taxes. But the truth is, no one in the world cares more about your money than yourself. So, if you want to really understand the tax system, learn something new, and save money in the process, it’s best to do your own taxes.
If you decide to go that DIY route and file your own taxes for the first time, it certainly won’t be easy. But the good news is–it’ll be satisfying at the end. More importantly, acquiring that experience will help you with filing future returns in the following years.
Considering how easy it has become to file taxes online, it comes as no surprise that almost 90% of all Canadians have ditched the pencil-and-paper filing method in favor of an all-digital process. And we couldn’t agree more with such a choice. Using electronic PDF forms instead of paper ones can save you the hassle of when the scanning all your hard copy files into PDFs when the due date approaches.

So, to ensure the tax filing process goes more smoothly next year, the most important thing is to start organizing all the necessary electronic documents in a systematic and easy-to-comprehend manner from day one.
And that’s when a professional solution for dealing with PDFs such as Able2Extract Professional comes in handy. Let’s see how it can help you with digital files and your tax season endeavors.
Secure and Encrypt Your Tax Related PDF Files
Security breaches and exploits of personal data make headlines almost every day now. Don’t just assume it won’t happen to you, especially when you can take some easy steps to prevent becoming a victim of information theft.
Able2Extract will let you encrypt and password protect tax-related files. Furthermore, you can set permissions and, for example, make it impossible for the receiver to copy-paste the content.
Here’s how it’s done if you want to create PDF files from any printable format:
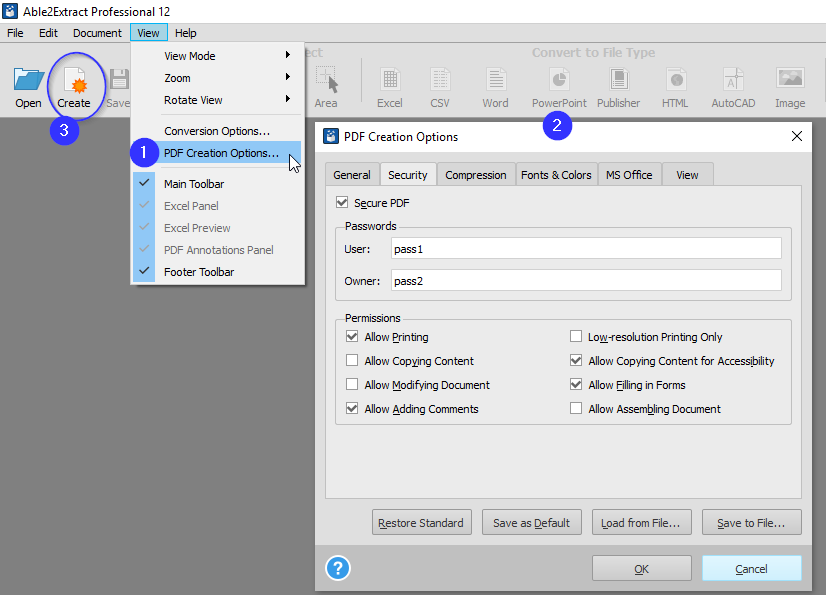
- Set PDF Creation Options: Right after starting Able2Extract, go to the View menu and select PDF Creation Options… to open them in the separate window. In the Security tab, choose Owner and User passwords and set the permissions below.
- Create the File: Next, click on the Create icon in the Toolbar, select the document, and click the Open button.
- Save the Secured File: To save your encryption settings, click on the Save icon in the Toolbar to overwrite the existing file or go to File>Save As… and choose a new name and location to create a separate, secure file on your computer.
The encryption process is a little bit different if you want to encrypt a PDF. Follow along:
- Open PDF: Click on the Open icon in the Toolbar, select the document, and click the Open button.
- Switch to Edit mode: Click on the Edit icon in the Toolbar.
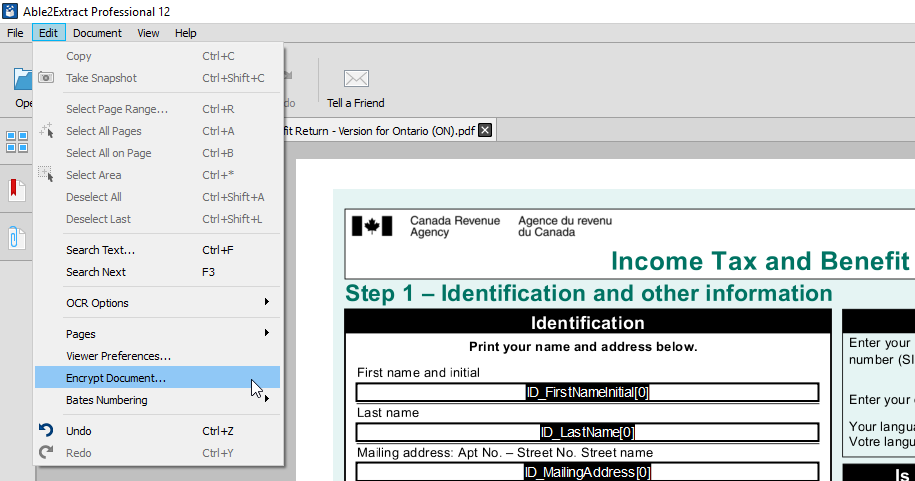
- Encrypt PDF: Go to Edit menu and select Encrypt Document… option. As explained before, set passwords and permissions, click OK to confirm, and Save the file.
Note that the Owner password acts as a “Master” password and you should keep it only for yourself since opening the file with it means that there are no restrictions to what can be done with the encrypted file.
The User password is meant for sharing the encrypted document and all the permission set in Able2Extract will apply to the document opened that way.
Remember that all taxpayers need to keep tax records and supporting documentation for six years. PDFs created with Able2Extract Pro 12 are compliant with the ISO standard PDF/a for long-time archiving which means that your digital files will be preserved for years to come if you integrate Able2Extract into your tax routine.
Keep Related Files in One Place with PDF Attachments
Various receipts, invoices, and reports you need to file your taxes properly and claim all the benefits you could be entitled to (such as Guaranteed income supplement or Canada child benefit) can easily fill up folders on your computer. Related documents can be separated into subfolders and tagged for easier cross-referencing, but there’s an even better way.
Let’s assume you’ve downloaded a PDF form you need to fill in with accurate data at the end of the tax period. You can streamline your workflow with Able2Extract by continuously attaching all the necessary documents directly to it, throughout the year. By using this tip, you’ll have only one file and links to all the resources right inside of it, so you don’t need to dig them up from the depths of your hard drive when needed.
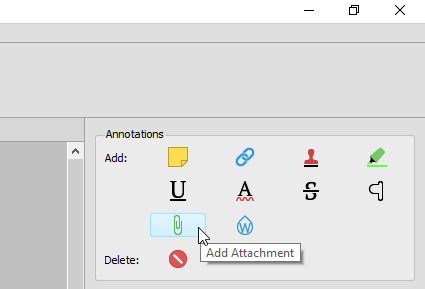
When you open a PDF in Able2Extract you are by default in Conversion mode and on the right-hand side of the interface, you can see the Annotations panel with various options. To attach a file to your already opened file, click the paper clip icon (when you hover over it, Add Attachment text will appear), select the file, and click on the appropriate section of the document to place a push pin.
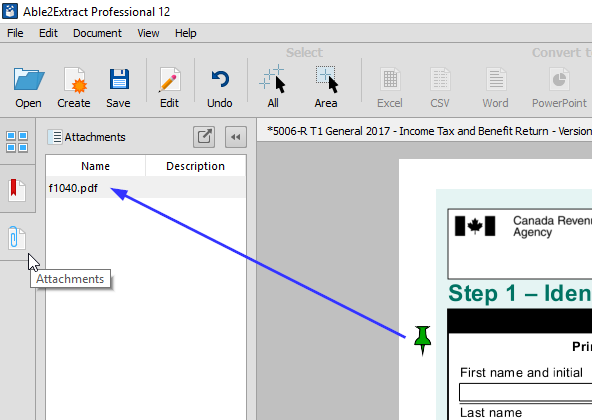
To open the attached file, click on the pushpin while holding Alt/Option on the keyboard down. The full list of attachments can be found in the Attachments tab on the left-hand side of the interface, below the Thumbnails and Bookmarks tabs.
Furthermore, in the Comments section on the right, you can see the date and time when every attachment was added. You can even write down your own comments so that you don’t have to remember important information yourself.
If you’re filing for a benefit return, this tip will help you gain easy access to all the slips, forms, and receipts needed to support any claim or deduction–right inside the official, fillable PDF form.
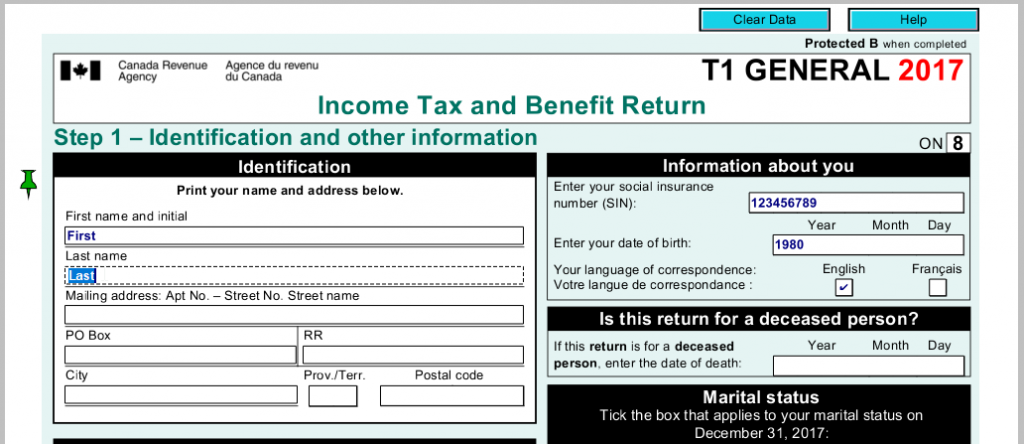
Fill in PDF Forms and Keep Your Information Private
There are a lot of PDF tools for filling in PDF forms, whether they’re desktop applications, online services, or even modern internet browsers.
Nevertheless, Able2Extract Pro 12 is a rare PDF form filler that doesn’t gather any information from end users. It doesn’t need an internet connection to work. There’s no backdoor that hackers could use to access your sensitive information such as your address, social insurance number, or employment income.
How can you take advantage of this when doing your taxes? Well, just download fillable PDF form and work with it in Able2Extract. By doing so, you’ll meet the tax deadline prepared and safe.
Working with PDF forms inside Able2Extract is simple. Open the file, click on text boxes and type, and change the state of checkboxes with a single click.
If there’s a hyperlink in the PDF form you’re filling in and you want to follow it to get more information about the required form fields, just left-click the link while holding Alt/Option button on your keyboard. The default browser will fire up and present you with a linked URL.
Redact or Delete Personal Data
Sometimes you’ll need to provide your documents for tax reviews or audits digitally. If you get audited or selected for review, you’ll get a letter with precise information about what you need to provide.
Yet, some of the documents containing required information will have personal or business data you won’t be comfortable sharing, especially if you need to send those files electronically.
That’s when you can take advantage of Able2Extract’s ability to edit PDF files directly.
As you already learned how to open the file with Able2Extract and switch to Edit mode, we’ll skip that part and jump right to explaining how to redact data you don’t want and don’t need to send.
When in Edit mode, look for the Redaction icon in the Content panel on the right. Click on the icon and then click anywhere on the document and keep the left mouse button pressed while dragging rectangle all over the area you wish to redact, whether it’s just one number, the paragraph, or the whole page. Repeat the process for the next section.
When you click on the redacted portion of the document, you’ll gain access to the Redaction options in the Content panel. Those are:
- Redaction color fill
- Outline color, line width, cap style, dash pattern, and more
- Rotation
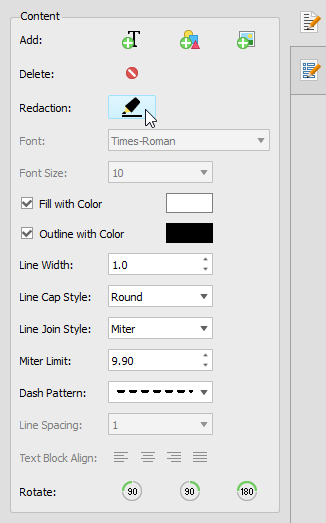
Additionally, you can click on the text while in the Edit mode and manually delete or change it or you can select the Delete icon (right above the Redaction one) and delete certain fields, sentences, and paragraphs more quickly. When you hover over the content inside the document while the Delete icon is active you’ll see the preview of what will be deleted if you left-click it. When you’re done, click on the Delete icon again to deselect it.
Convert PDF to Excel for Precise Calculation
Microsoft Excel is the go-to tool for dealing with complex data. Formulas and functions in Excel can help you cut down on time needed for calculating taxes data you’re required to provide for your tax returns.
Even if you’ve kept your digital documents organized, it doesn’t mean filling in tax forms will be easy and straightforward. Gathering scanned documents like receipts and ledgers collected over the year itself can be a tiresome task, let alone calculating a total. Errors can occur easily and that can lead to more problems with Canada Revenue Agency in the long run. So, precision when doing this kind of work is essential.
The best way to go about this is to use the Custom PDF to Excel feature–one of the most prominent features of Able2Extract which really sets this tool apart from the competition. Combined with Optical Character Recognition (OCR) for turning image-based PDFs into editable content, the PDF to Excel conversion can extract and prepare all the data you need for quick and “bulletproof” Excel calculations.
Let’s see how you can custom-tailor your PDF to Excel conversion and get the best possible results that won’t need any additional clean-up.
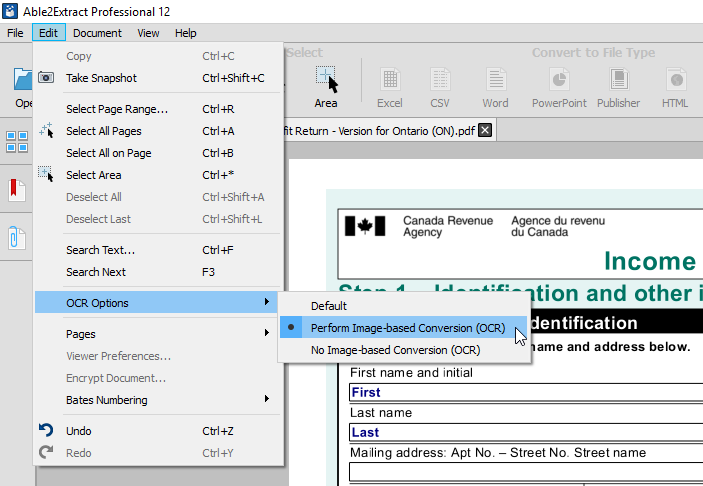
Open the file you want to convert, and if you have a scanned document, first go to Edit>OCR Options and select Perform Image-based Conversion (OCR). Now select the area for conversion in the Command toolbar (All or Area) and click on the Excel icon. In the pop-up window click the Define button in the Custom section.
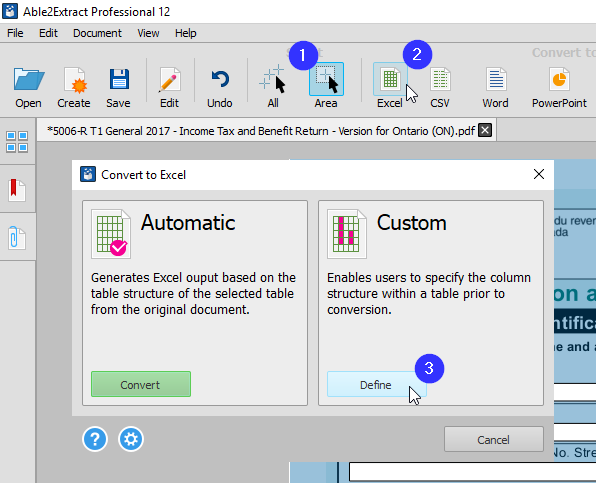
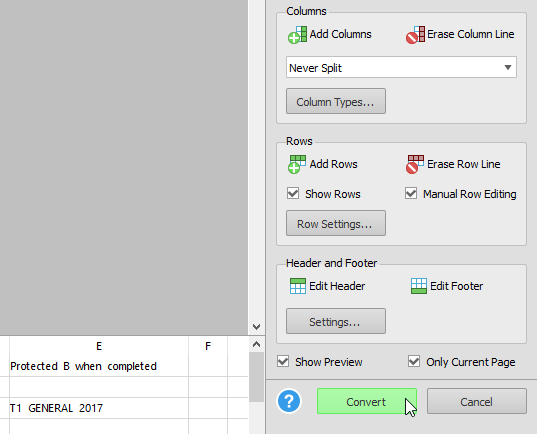
The Custom PDF to Excel panel will present itself on the right and you should first check the Show Rows and Manual Row Editing boxes to take full control over the document layout. Then, add rows and columns if needed, fine-tune them by moving the row and column preview lines in the opened document, and click Show Preview to make sure you’re on the right track.
When you’re satisfied, go to File>Save Custom Excel Template As… and save the template for reuse later with the same layout documents such as monthly reports and standardized receipts. (When you get the same kind of document for conversion just load the template by going to File>Load Custom Excel Template…) Lastly, hit that green Convert button and you’ll get an Excel file with proper formatting, ready for precise calculations.
Final Words
Doing your taxes will never be a walk in the park, but with the help of digital tools, the task undoubtedly becomes easier and less prone to costly mistakes. There are a lot of tools and services developed specifically to help you streamline the process of filing tax reports. You should consider using certified tax software to save yourself the time and effort, and reduce the annual tax-season stress.
On the other hand, a powerful all-around tool such as Able2Extract can complement any tax-specific tool in the ways described above. It can be useful in a number of situations when you need complete control over your digital documents as well.
Bonus tip: Check out these 8 last-minute tax resources that provide knowledgeable and easy-to-understand articles and tips on various tax dilemmas.
Start with our suggestions and implement them in your regular tax filing workflows. We guarantee that very soon you’ll discover even more useful tricks to improve your productivity and document management. And when you do, make sure to share them with all of us in the comment section below.