 If you’re not sure how to compress a PDF so that you can share and store it more easily, then you’ve come to the right place.
But, before we go on to the tutorial, let’s explore what exactly PDF compression implies.
If you’re not sure how to compress a PDF so that you can share and store it more easily, then you’ve come to the right place.
But, before we go on to the tutorial, let’s explore what exactly PDF compression implies.
One of the biggest pet peeves of dealing with a PDF file is the large file size. There’s nothing worse than an email stuck in your outbox because of a large PDF attachment—unless, of course, it’s a slow PDF download from the web.
How can you slim down the size of your PDF document? While this heavily depends from PDF to PDF and the type of content it contains, there are a few general PDF creation options in particular which you should pay close attention to. Some fine-tuning here and there will go a long way to shave the megabytes off of your file.
This is a good place to start to cutting down the bloat. Every time you hit Save in an application, you end up with a usually bigger file size. This is because the function saves the changes and appends them to the file. The same goes for PDF files.

Instead, use the “Save As” command. By doing this, you overwrite the entire file, eliminating unused objects and accumulated changes. The result is a smaller PDF file you can manage. So go for the “Save As” option once you’ve added everything you need to your PDF.
Given the visual nature of digital content today, images are a big part of PDF files. However, if your PDF isn’t intended for high resolution needs, you can keep your file under control by downsampling and compressing your images. When you downsample bitmap images you basically decrease the amount of pixels in it which reduces the overall resolution and hence, the size of the PDF.
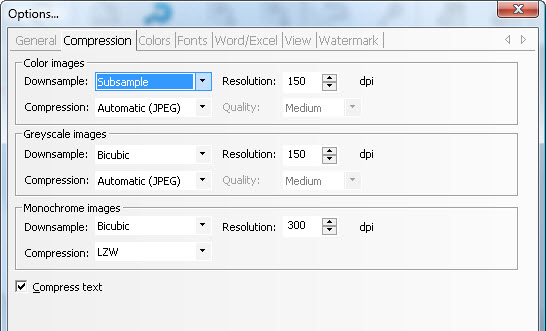
Downsampling options will tell your PDF program know how you want to delete those pixels. You’ll be able to choose mainly between bicubic, subsample, and average downsampling methods. Each has its own advantages, so choose wisely. As well, you can usually set the desired resolutions and decide if you want to compress your images using popular compression algorithms such as ZIP, LZW, or JPEG.
You may have heard of RGB and CMYK colour spaces before. Each one has different methods of handling colour. In general, CMYK is ideal for print purposes, while RGB caters to on screen viewing.
If your PDF is mainly going to be viewed on the web or on a computer screen, choose the RGB colour space for your PDF images. In some PDF creators, you can choose to convert CMYK images to RGB if needed. It requires less data than CMYK. And one less data channel means a smaller file size.
By embedding fonts, you are essentially attaching the entire character set within the PDF, which can puff up the file significantly. Try to subset the fonts instead. It will keep the PDF size to a minimum.
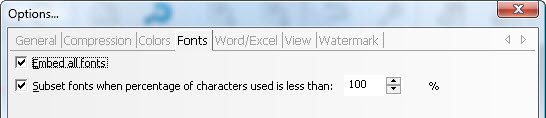
When you subset a font, you attach only the font characters that are used in the PDF. If a special character like “#” isn’t used in the file, the character won’t be included. In most cases, you can choose to automatically subset fonts if the character usage is less than a certain amount. Take advantage of this feature if you have it. Your PDF fonts are just as equally important as your images.
Depending on who and what your PDF content is intended for, you can scale down the bloat considerably. Applications that create PDFs for specific needs, like Adobe’s Photoshop for instance, will allow you to save PDFs with advance settings such as Preserve Photoshop Editing Capabilities.
But if your PDFs won’t be exclusively opened in Photoshop for editing, then there’s no need to prep the file for it. Thus, before you save a PDF with all the bells and whistles, get a good idea of how your PDF will be used and you can easily reduce the size accordingly.
PDFs are supposed to be high in quality, but it doesn’t necessarily mean that it has to be reflected in the file size. You can get a manageable PDF file with just a few adjustment s. And as an added bonus, you can accomplish most of these tweaks with Sonic PDF Creator. Just go to View>Options for Creation…. and you can access them through the dialog.