When working digitally with PDFs, you no doubt develop your own workflow and habits. From the files you open, to the tasks you perform to the software you use.
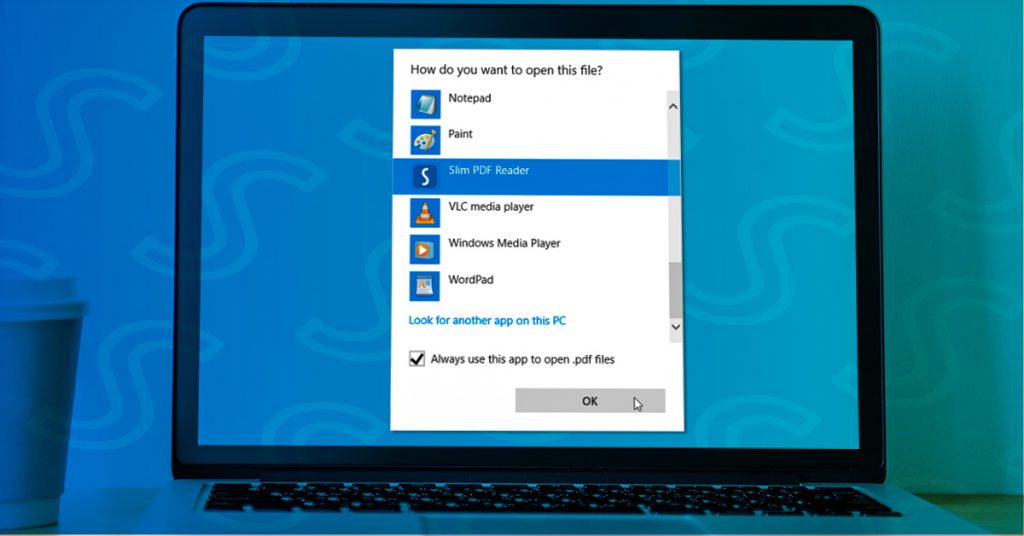
As a proficient computer user, you may be used to double-clicking a file and simply having it open as needed in the software you need instantly.
However, being able to do so first requires that you have your favorite software of choice set up to open the associated file format by default. If you don’t have a default program set up, you’re left to select the software you want to use each and every time. Fortunately, this is easy to fix.
For those of you who already use Slim PDF Reader and haven’t set it as a default yet, we’ll walk you through the process.
We all use Microsoft Excel for different reasons. It’s a great tool for any basic or complex calculations because it’s so easy to adjust and edit your data. Besides this, there are several important features why someone would be using Excel on a daily basis:
To visualize data — Excel charts are not perfect, but they serve a great purpose for visualizing information and numerical data.
For checklists — It seems unusual, but people do use Excel to take notes, create tables and lists since it’s flexible, powerful and reliable.
To deal with a large quantity of data — Pivot tables and data filtering is useful and can help when you wish to find any info on complex data sets. Also, Excel allows you to perform all sorts of tasks regarding quick data manipulation.
Excel is amazing, but it isn’t surprising that the data imported into Excel spreadsheets oftentimes comes from a PDF document. It isn’t rare to find bank statements, various legal documents, account reports, and other corporate and federal data locked in PDF, data that needs to be sifted through and analyzed in Pivot tables.
Facebook is the number one site where you probably spend most of your time online. Undoubtedly, the comments, messages, photos, and videos you post up end up accumulating into one big online scrapbook of your best and most memorable moments in life. It isn’t any wonder then that you would want to preserve that content offline and onto your computer?
While the videos and photos you have posted up might already be on your computer, there are some related bits, like the notes, comments, Wall posts or Facebook messages, which aren’t.
In fact, one of our PDF Creator Facebook app users was wondering if there was a way in which she could download and get all of her Facebook messages into PDF format.
If you want to download your Facebook data into a PDF file, here’s a detailed and slightly altered step-by-step version of the solution we put together and which you can try out for yourself.
1. Log into your Facebook Account
2. Go to Account Settings
3. Under General settings, click on the “Download a copy” of your Facebook data link below your personal information settings.
You’ll then get an overview of what information will be archived and which won’t.
4. Click on the Start My Archive button and confirm your download. This process may take a while depending on how much data you have. Facebook will send you a link to download your archive file via email.
As Facebook notes, all the data contained on your Facebook profile will be downloaded into one single archive. However, you will get the chance to choose which folder and data you can convert later on.
5. Check your email for the link and click on it to reconfirm your password. Download and save the zipped file to your computer.
6. Extract all files from the zipped folder into a folder or location you can easily access. It contains the individual files of your data– photos, videos, and web-based content.
To access your messages, go to HTML> Messages file.
Double click to open the Messages file in your browser to make sure all the content you want is there.
To convert this data into the PDF format, you can use Sonic PDF Creator 3.0 to convert HTML to PDF.
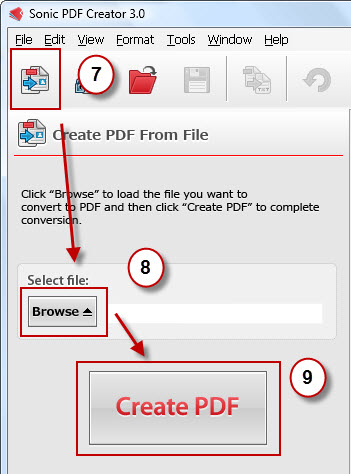
7. Once installed or if you have the program already, open Sonic PDF Creator and click on the Create PDF From File icon on the command toolbar.
8. Click on the Browse button. Select and upload your Messages HTML file.
9. Click the Create PDF button. This should start the conversion process.
Once your Facebook data conversion is done, you can then add whatever PDF features you want to the file. Add a password, headers, footers, watermarks or bookmarks. When you’ve added all you want, simply save your PDF file in a location of your choice.
This process can work for any of the HTML data files you have in your archive. It’s an easy way to keep or reuse your Facebook content in a secure manner while customizing the file to your needs. Give it a try.
If you have another way of saving and preserving your Facebook data, let us know in the comments below!
Last week, we gave you a couple of tips on how to incorporate a few of our tools into your daily study grind. Those were tools you could seamlessly fit into your existing list of handy resources to help you get your work done.
But for the most part, as a student, you’ll be using digital documents as a major resource that can, indeed, make your school work (and learning) much easier. Yet, the only real problem is getting those digital documents to suit your needs. As they are, they may be difficult to use.
Students are no stranger to PDF PowerPoint notes from a professor, nor are they strangers to the obstacles they pose. Luckily, Sonic is up for tackling such a task.
Sonic PDF Creator has a feature that lets you combine those multiple PDF pages onto a single page for quick overviews that are perfect when it comes to group studying, delivering presentations, or providing more compact resources.
If you’re unsure of how to get started, here’s a look at the handout creation options in Sonic that will let you format your PDF content into a handout.
1. Open your PDF file in Sonic PDF Creator
2. Go to Tools > Create Handout . . . . You’ll be given the n-Up Pages dialogue box where you can then customize and create your own handout.
3.Select the paper size of the handout
The very first thing to consider is the paper size and the orientation. Each PDF is different and no single handout formatting is a one-size-fits-all deal. Deciding which one is right for your content is easy.
From the drop down boxes you can choose from a wide range of paper sizes for your printed handout (including popular sizes: A4, Legal, 11×17, etc.). Then designate whether your pages will be in portrait, landscape, or Auto (according to custom width and height, which you can set manually).
4.Set the scale for your handout pages
When dealing with scaling options, you get to assign how those PDF pages will fit onto the page of your printed handout, whether letter size, legal, or 11×7.
The Auto feature lets Sonic calculate how to fit those PDF pages according to the paper size you selected. If you’d like to use the original size of the page, select Use Original Size. Or if you’d like to set the scale of your PDF content yourself, you can easily designate the width and height yourself.
With the Proportionally box checked, your destination area on the handout will remain proportional to the original page size.
5.Decide on the layout
Now that you have the content scaled down to the paper size and orientation you’ve selected, you get to decide the layout of that content.
When creating your layout first make sure you decide on the measurement unit (point, inch, or mm) you need Sonic to use in order to accurately space the content for your handout.
For the layout, you can designate a different number of PDF pages per column and row along with the margin spacing around them. The gutter measurements (in case you need to bind the handout) can easily be customized to any length you wish.
You can then designate how many pages you want repeated in the hand out and the order of the pages. Note that if the pages of your original PDF content are numbered, depending on your column/row layout and if you want double sided pages, you may want to carefully plan out how your pages can be effectively ordered.
When deciding on the order of the pages, you have 3 options:
Across: Runs from left to right, then top to bottom. Down: Runs from top to bottom, then left to right. Stack: Runs from top left of each page, then to right, then to next row.
6. Draw crop marks on your handout pages
Crop marks can also be drawn onto the handout. You can choose from drawing crops in the corners, center, or both (with the Draw Crop Marks option). After you decide which crop marks you want, you can adjust and customize them manually.
7.Allow for bleed allowance
For handouts that will need cutting, the Bleed Allowance options will let you specify your own measurements to allow for any deviations in cutting the paper to the finished page size.
You can choose from :
None: No bleed allowance. From original PDF: Use the bleed information from the original PDF file. Specified: User specify the bleed allowance amounts.
8. Once all your settings in place, click on OK . Sonic will generate a preview of the new handout for you.
9. If all looks okay, you can then save it using the Save or Save As options under the File menu, and then print it out.
If you created a handout with Sonic PDF Creator before, which creation options did you use to make your PDF content look like a professional handout?