


Part 9 of 13 in our How To Use AutoCAD series
Placing dimensions in AutoCAD is essential for documenting your drawing. AutoCAD 2016 offers the same dimensions as the previous versions, that is: linear, aligned, angular, arc, radius, diameter, ordinate and jogged.
Using the “Linear” dimension command, you can create and place a horizontal, vertical or rotated dimension line.
You can accomplish this task by following these simple steps:
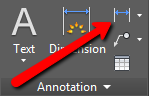
1.Locate the dimensioning tools in the Annotation panel, on the Home tab. Click on the drop-down arrow and choose “Linear”. This will give us a horizontal or vertical distance between the selected points.
2.Click on the snap points to specify the dimension line location.
3.Once you specify the dimension points, you have several choices: if you pull to the right, you’ll get horizontal measurement; if you pull upwards you’ll get vertical measurements.
4.Left click to complete the dimensioning and continue with your work.
In practice, you’ll probably have to create various dimensions, as well as utilize different dimension styles, depending on your project. For an all encompassing guide on using this AutoCAD feature check out CAD Tutor’s AutoCAD Dimensioning Tutorial.